Top Blog Recipes

23 Aug 2020

MONSTER LAMB DONER KEBAB

Changing the Reputation...
Kebab’s especially doner kebab’s in the UK have such a poor reputation mainly from the hordes of alcohol infused people craving that late night sustenance for just £4.00, this lends itself to the low quality of the doner kebab meats and I say meats as not all lamb doner kebabs contain only LAMB!  But as is true for most fast foods when made fresh from their original heritage and recipes, from fresh ingredients a kebab is a glorious feast of marinated lamb, spices and herbs cooked over open flame for authentic flavour and self basting in all its clean glorious fats, served stuffed in wood fired flatbreads with crunchy salad and a vibrant lemon garlic yogurt is exactly what a doner kebab should be.

Prep time 30 minutes / Marinating time 1hr-24 hrs / Cooking time 1.30hrs


Ingredients 
(serves a crowd)

750g of minced lamb 
750g minced breast of lamb
1.5kg boneless leg of lamb trimmed
1 whole breast of lamb (optional)
1 onion minced or grated
6 cloves garlic grated
300ml olive oil
1 small bunch fresh coriander finely chopped
1 tsp ground cumin
2 tsp dried oregano
2 tsp dried mint
2 tbsp Himalayan sea salt 
2 tbsp fresh ground black pepper 


Assembling the Kebab
You can ask your butcher to slice your leg of lamb in to thin steaks around 4” square and also to mince you a 750g breast of lamb, as well as cutting your whole breast of lamb also in to 4” squares, but if your like me and enjoy the process of preparing everything then just allow some extra prep time.

In two large bowls place the leg steaks and breast of lamb squares in one bowl and combine the two lamb minces in the other bowl.  Pour the olive oil over the lamb along with half the salt, pepper, mint and oregano, massage all over the lamb, cover and leave to marinate in the fridge over night if you can but as little as one hour is fine.

To the bowl of lamb mince add the remaining salt, pepper, oregano, mint along with the ground cumin, coriander, onion and garlic mix well to combine but don’t over work the mince or it will become tough, take a tennis ball size of mince and form into a patty around 5” in diameter, repeat with the rest of the mince then cover and leave to marinate along with the lamb steaks.

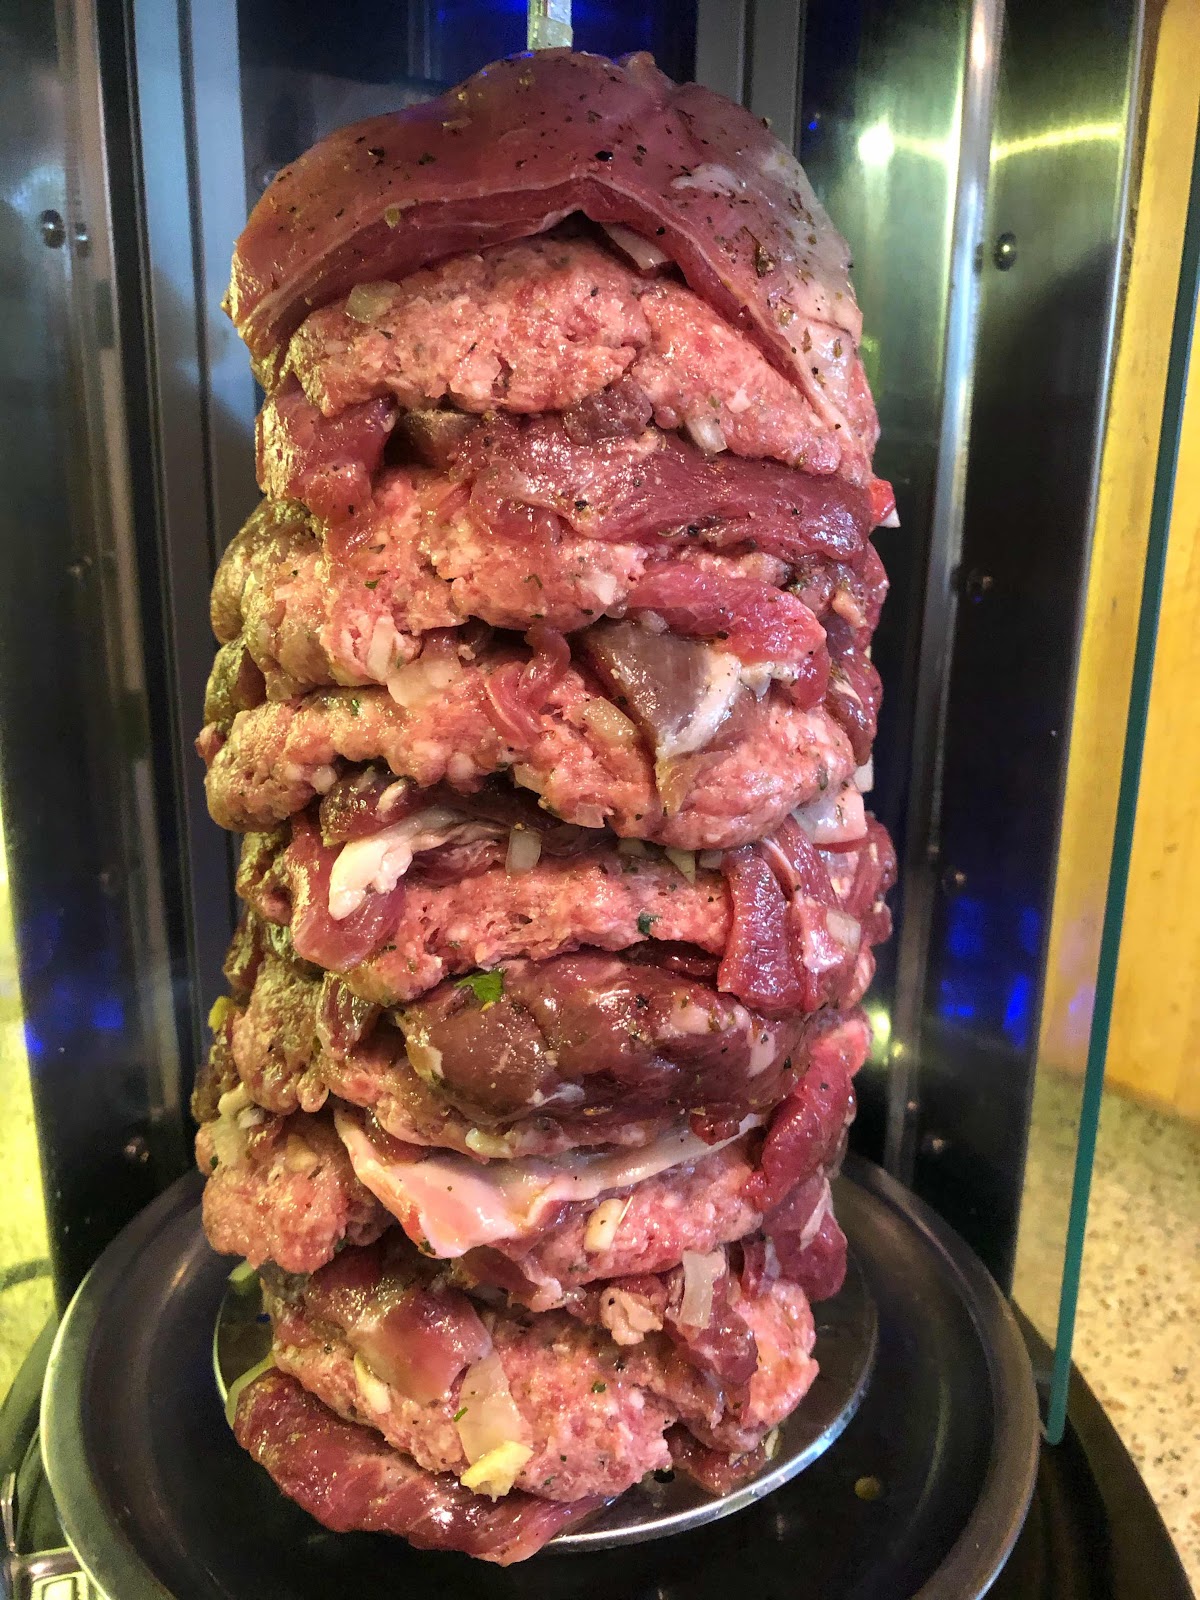
When your ready to cook if you don’t have a kebab or chicken rotisserie you can still layer this up on a large metal skewer and roast on the BBQ or in the oven over a drip pan.

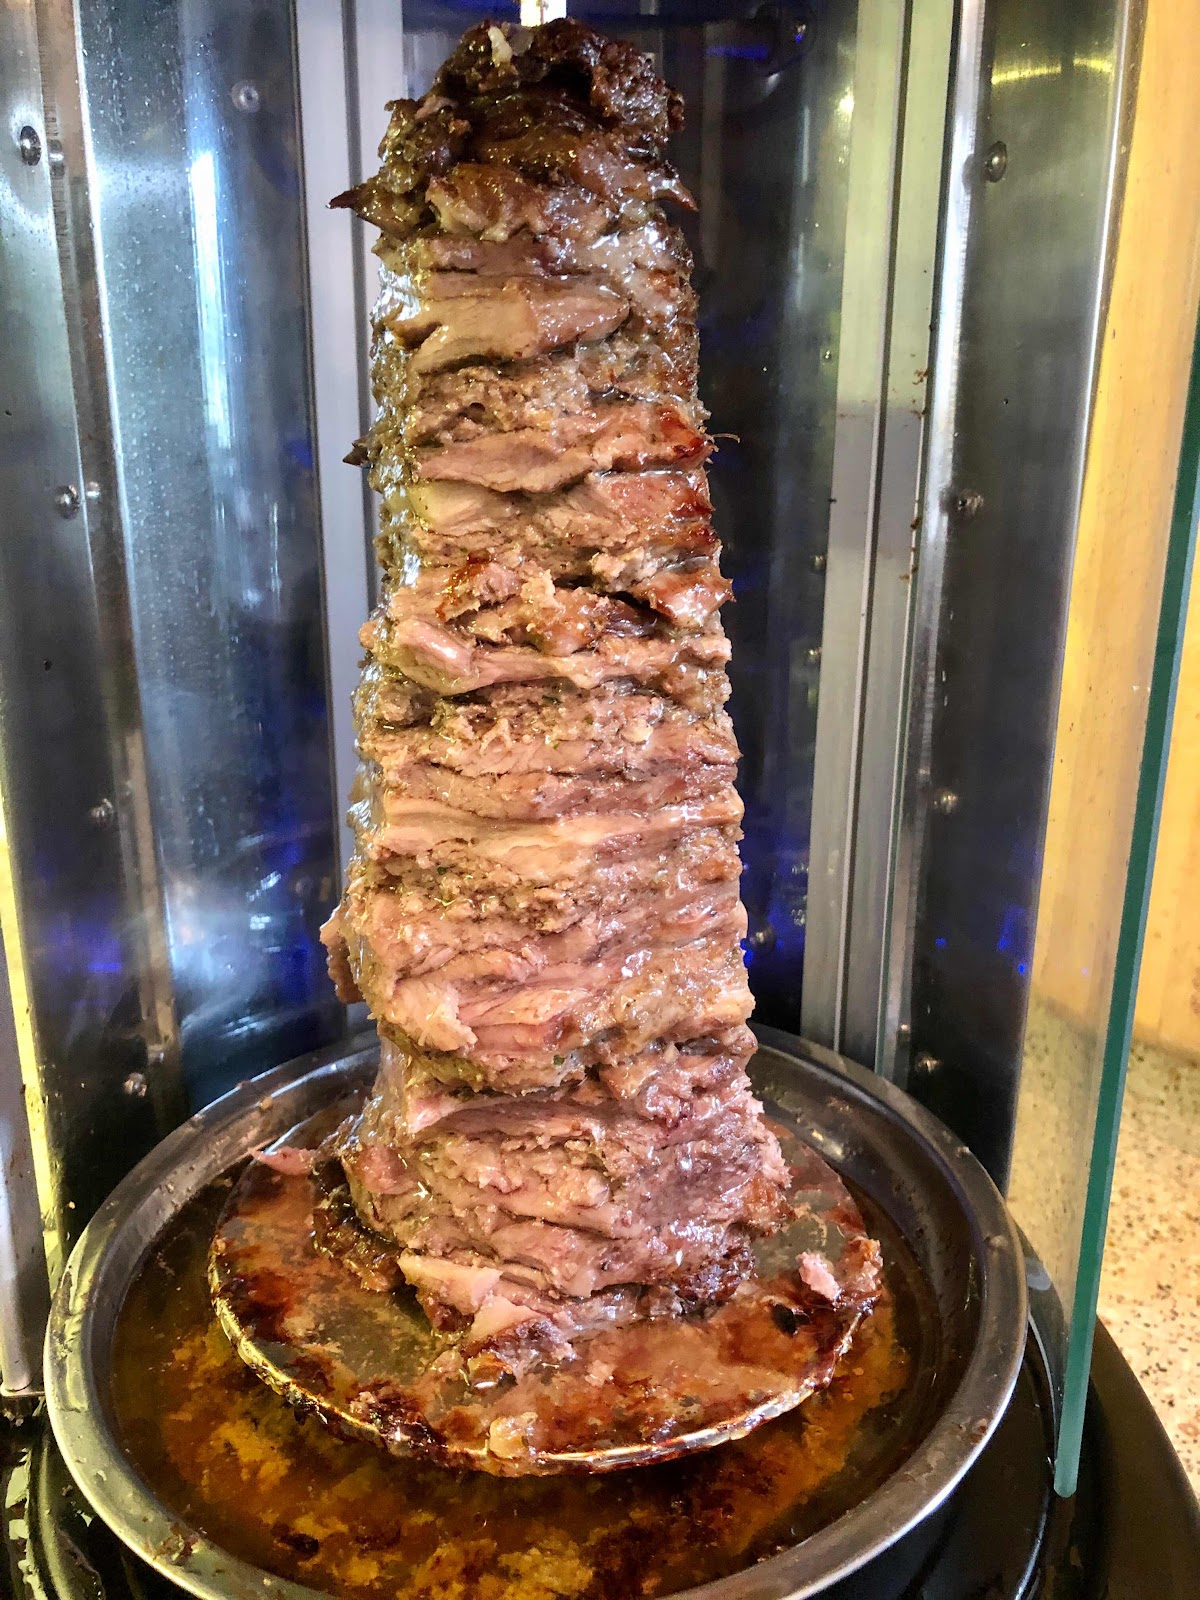
Start with a square of breast of lamb, followed by 3 lamb steaks and then a minced patty, repeat until all meat is used finishing with a breast of lamb.  There is no right or wrong way to layer up your kebab.

Cooking on a rotisserie after 30-40 minutes shave off the cooked layer and enjoy, continue cooking the kebab and shaving off as required, this will keep in the fridge for up to 5 days and freezes well, ready for the next kebabs.

Cook in the oven by placing the skewer over a roasting tin you will allow the fat to render out in to the pan, turn the kebab skewer 180 degrees every 15 minutes to ensure even basting and cooking, you can cook this all the way through in one go around 1 hour.


22 Aug 2020

PALEO FLAX AND CHIA SEED SCOTCH EGG

This is the best result so far...in trying to substitute the gorgeous crunch that you get from a panko crusted fried scotch egg!  If you don’t have to substitute breadcrumbs DON’T!  But for us that do this recipe was a rather good improvisation.  I make my own sausage meat from organic pork shoulder and belly minced and flavour with a herby mix of fresh marjoram, sage, thyme and chives along with sea salt and fresh ground black pepper and sometimes, only sometimes just a pinch of brown sugar.  I’m lucky to have our own hens who give us beautiful garden free range eggs, they keep the slugs and bugs under control, eat half our garden crop of chard, kale and greens but we don’t mind as their eggs are glorious.

Prep time 15 minutes / Baking time 15-20 minutes 


Ingredients 
(makes 4)

4 eggs just boiled (6 mins 40 seconds)
250g pork shoulder minced
250g pork belly minced
1 tsp chopped fresh thyme
1 tsp chopped fresh chives
1 tsp chopped fresh marjoram  
1 tsp chopped fresh sage leaves
1 tsp sea salt
1 tsp black pepper
6 tbsp whole flax seeds
6 tbsp whole chia seeds

Pre heat your oven to 180 C / 356 F.  Bring a pan of water to a simmer and add your eggs to boil, set the timer for 6 minutes and 40 seconds EXACTLY.  As soon as that timer rings drain the hot water off the eggs and fill with cold water, drain and re fill twice more in order to stop the eggs cooking any further.  This also stops that dark ring around the yolk from over cooking appear.  Peel and reserve to one side.

Place all the ingredients except the flax and chia seeds in a bowl.  Blitz the flax and chia seeds in a magic bullet or coffee grinder to make a seed flour, don’t over blitz or you will end up with a nut butter.  Place 2 tbsp of the seed flour in the bowl with the sausage mix and combine together with your hand.

Divide the mixture in to four, take a portion and press out in your palm to form a patty, place a egg in the center and squeeze the meat mixture up and over the egg until completely covered, repeat with the remaining 3 eggs.  Place the flax and chia seed in a bowl and roll each scotch egg in the seed crumbs coating all over.  Bake in the oven for around 15-20 minutes, you can tell when they are cooked as there is a little resistance and bounce when you push them.  Enjoy.


SUN (OVEN) DRIED TOMATOES

WoW...

Really simple to make, so versatile to use, easy to cook with and to preserve and what a joy to eat and for me to have stored in my pantry for that burst of garden harvest sunshine throughout the winter.

These just pop an abundance of flavour, a soft chewy intense burst of sweet tomato with aromatics of thyme and oregano followed with a dressing from the lemon olive oil and apple cider vinegar preserving oil.  These are just perfect on their own but really lift the flavour on pasta dishes, salads and cheese boards.  You can also just blitz them as they are for a great pesto, add some Parmesan cheese and pine or walnuts, or pour over some boiling water, leave for 10 minutes to rehydrate, blitz and add to a great tomato sauce for lasagna, enchiladas and pasta dishes.

Prep time 10 minutes / Oven drying time 4-6 hours


Ingredients 

Approximately 50 cherry tomatoes halved
1 tbsp Himalayan sea salt 
1 tbsp fresh ground black pepper 
1 tsp dried thyme
1 tsp dried oregano
300ml cold pressed olive oil
1/2 lemon juiced
50ml apple cider vinegar
1 medium ball mason jar and lid


Pre heat your oven to 100 C / 212 F.  On a baking tray with a rack place the tomatoes halves skin side down, sprinkle with the salt, pepper, thyme and oregano.  Pop in the oven and leave to dry out for 4 hours.  Once your tomatoes are dried turn off the oven and leave in the oven until completely cooled.  You can just fill your jar with the tomatoes and olive oil lemon and apples cider mix, then store in the fridge for up to 6 weeks, but if you want to preserve a glut for over winter you need to do this in sterile jars.

To preserve heat your jars and lids for 5 minutes in a pre heated oven 150 C / 302 F, meanwhile place the oil, lemon juice and apple cider vinegar in a saucepan and bring to a gentle simmer until 72 C / 161 F.  Do not boil, take off the heat, pack the jar with the tomatoes, pour over the hot oil leaving one inch head space, pop on the lid and leave to cool.  You should hear a “ding” when the preserving lid pops down sealing the jar which tells you that jar is now d]safe to store in the pantry.  If your led depression still pops when you push it then store in the fridge and consume within a few weeks.


KICKING HOT RED AND GREEN ENCHILADA SAUCE

Three Great Tex-Mex Sauces

This red enchilada sauce is one hell of a insane hot lip smacking hot hot hot sauce.  Sometimes I can't actually face this sauce, in fact I am sure this sauce should come with a side of pepto bismol !  So what I do sometimes is marry up a few spoonfuls of this kicking hot enchilada sauce to a batch of milder red enchilada sauce which gives the sauce some va va voom .  I also love to add a ripple of green roasted tomatillos enchilada sauce through my red enchilada sauce I find the combination divine.


INGREDIENTS
FOR THE HOT KICKING ENCHILADA SAUCE

1 tbsp oil
1 tbsp flour
3 tbsp hot chilli powder
(on reflection maybe mild!)
1/2 tsp garlic powder
1/2 tsp cumin
1/2 tsp oregano or thyme
1/2 tsp salt
400ml chicken stock

Heat the oil and add the flour and gently cook out for a few minutes, add all the dry ingredients mix well and then add the chicken stock, using a whisk to ensure no lumps, bring to a simmer and cook for around 15 minutes on a gently simmer. 

This sauce base is a fabulous punch of heat and flavour for lots of dishes, I will admit to finding it too hot on  it's own for my burritos, but used as a accompaniment it has a wonderful variation of uses, a hint there and a dollop in mayo there will give you a great use for this sauce.

FOR THE MILD TOMATO ENCHILADA SAUCE

 1 can of chopped tomatoes
1 onion finely diced
dash of ooil
1/2 tsp garlic powder
pinch of salt and white pepper
dollop of concentrated organic chicken stock jelly
4-6 tbsp of the kicking hot enchilada sauce
(or as much as you like)

Place the ooil in a pan and gently soften the onions, add the garlic powder, tomatoes, salt and pepper and simmer for 5 minutes, using a potato masher crush the tomatoes and onion in the pan to a smooth pulp, add the chicken stock and hot kicking enchilada sauce, taste and adjust seasoning if needed.

FANTASTIC FRESH ZINGY ZESTY SALSA VERDE TWO WAYS
 
I love this super fast and so easy salsa verde because it packs a green fresh zingy zesty flavour that is super versatile.  Roasting the tomatillos adds a whole another depth of flavour.  I always have a fresh batch sitting around in the fridge ready for dipping with corn chips or to compliment, burritos, tacos, nachos, quesadillas, this salsa is also great as a sauce over chicken.  This sauce will keep for 5 days in a ball mason jar in the fridge but mine never lasts that long!

Prep time 10 minutes / Oven time 30 minutes 


Ingredients 
(makes 500ml approx.)
 
6 fresh green tomatillos
1-2 fresh green jalapeno chilli's
1 clove garlic
1 habanero chilli (instead if you want to pack a wahoo punch)
10 stalks of coriander 
1 large pinch of sea salt
1 small onion fine fine chopped

Heat your oven to 200 C / 400 F on a baking tray place the tomatillos, jalapeƱos and garlic and roast in the oven for around 30 minutes.  Remove from the oven and very simply place all the ingredients except the onion into a blender and blend or pulse until smooth, transfer into a bowl and add the onion, mix well and taste, adjust the seasoning if needed, chill before use.
 
If you want a this as a green enchilada sauce cook the raw salsa before using to make a softer sauce.


20 Aug 2020

RUSTIC CHEESE AND RED ONION QUICHE

A simple cheese and red onion rustic quiche, ready in under 30 minutes with a little help from my prep ahead stock.  

When ever I am making pastry I always make a 1kg batch this I then portion in to 6 or 8 portions and vacuum pack and store in the freezer so that when I have a glut of eggs building up from the hens in the garden I just pull out a portion, leave to defrost in the fridge overnight or if using on the same day on the side at room temperature for one hour until just defrosted but still cold, then I’m good to go, just pre heat my oven roll out the pastry, I roll out on parchment paper when in a hurry as thar means there is no clean up after, then I line the tin with the pastry and fill with eggs, cream, grated cheeses and sliced red onions, bake for 20 minutes and that’s it a gorgeous rustic tart for lunch done.


Ingredients 
(serves 4-6)

1 kg Prep Ahead Pastry
900g plain flour
220g lard roughly chopped
200g cold butter grated
360ml cold water
1 tbsp Himalayan sea salt 

Quiche 
5 eggs beaten
100ml double cream
1 red onion finely sliced
200g mature cheddar grated
75g gyuere grated
75g emmental grated
Himalayan sea salt 
Fresh ground black pepper

Place the flour in a large mixing bowl, add the butter, lard and salt then cut through with a knife to loosely combine, add the water and just bring together to form a ball, don’t work the pastry to hard.  Divide in to 6 and wrap and place 5 in the freezer for next time.  The remaining pastry wrap and leave to rest in the fridge for at least 30 minutes, pastry likes to be cold, warm pastry is not fun to work with.

Pre heat your oven to 190 C / 374 F.  Roll out your pastry to fit your quiche tin, I used a 10” tin, line the tin with your pastry, push the pastry into the fluted sides of the tin and squeeze the pastry up the sides so that the pastry is slightly above the rim, this is to compensate for pastry shrinkage during cooking, this just keeps the pastry higher than the filling and gives a lovely homely rustic finish to the quiche.

Mix all the quiche ingredients together and pour into the pastry case, pop in the oven to bake for 20 minutes, check for a wobbly in the centre, you want just a wobble, just set, not a loose wobble, if your wobble is still loose bake for a further 5 minutes.  Remove from the oven and serve with a great green salad.

11 Aug 2020

CHARGRILLED CHICKEN AND CRANBERRY MAYO BURGER

Juicy succulent chargrilled chicken breast, seasoned with salt and pepper topped with crispy sweetcure bacon, jalapeƱos, tomatoes, red onion and finished of with cranberry mayonnaise, for me served wrapped in a crispy iceberg leaf but works even better in a butter toasted brioche bun.


Ingredients 
(serves 2)

2 chicken breast bashed
4 rashers sweetcure bacon
2 whole iceberg leaves
2 tbsp jalapenos 
1 tomato sliced
1/4 red onion sliced
1 generous tbsp cranberry sauce
2 generous tbsp mayo

Bash the thickest end of the chicken under a sheet of cling film until the same thickness all over, heat your chargrill or griddle pan medium hot, season the chicken with salt and black pepper, sear the chicken on each side for 2 minutes, turning only once, at the same time cook the bacon until crispy.  Then load up your iceberg wraps or buns with the chicken first, then the bacon and the rest of the ingredients, enjoy.


GARDEN BERRY FOOL

The wonderful thing about growing as much of your own food is that joyous moment when your crops start to be ready to eat, late spring is a great example of all the fruit bushes starting to produce juicy ripe succulent raspberry’s, blueberries, black currents and goosegogs.  I still get such a sense of pleasure and satisfaction wandering down the garden to go pick some berries for breakfast or as in this case a cream fool pudding for my husband.


The Garden Bounty


Ingredients 

500 ml double cream room temperature 
400g mixed berries
2 tbsp icing sugar optional
1 tsp vanilla extract optional
80% chocolate chunks optional

Simply whisk the cream until soft peaks, I don’t add the icing sugar or vanilla but for a sweeter cream fool add the icing sugar and vanilla to the cream before whipping.  Heat one quarter of the berries warm in a pan to just soften and crush slightly, this is optional, it just releases the berries juices and adds another level of flavour rippling through the finished pudding.  Layer the fruits, cream and softened fruits alternatively in your glass serving dish, finish with whole berries and optional chocolate chunks, place in the fridge for at least an hour before serving.


3 Aug 2020

PASSIONATE ABOUT MANURE

FEEDING THE GARDEN
This is a passion I have learnt a lot about over the last eight years, since keeping pigs, goats, sheep and chickens there has been a lot of manure!  Growing all our own vegetables successfully and un successfully every year comes with the important task to feed (manure) your empty vegetable beds, I do this in winter and again in the rotating empty beds at the end of the summer harvest.  I like to think of this as the same as feeding our livestock, every living thing has to eat and vegetables are no different, the sun and water are enough but give them great manure and soil they like and they will generally reward you with a bounty of generous vegetables, this is mostly true but I do find every year a different crop that was prolific the previous years turns out to be a poor crop the following year, this year my beetroot and courgettes are terrible, that’s a first for me, go figure!

Year Five Farm Manure Heap


There is a little science to manure and I have learnt the hard way as always!  I like experience to teach me and one year I took the manure too early from the farm muck heap, dug in to all 30 of our 2 m x 1 m beds and basically I grew green GRASS TURF this was because the manure was young had not heated hot enough to kill off the seeds and basically I just dug in fertilised grass seed, it resulted in the most hardest constant weeding over a whole season I have ever done!  Lesson learnt, let the muck heap manure mature, so here I am year five and I have the most premium grade manure ready to use 
every year from now on, and it is a huge muck heap so I will be able to share in abundance with my other veg growing friends.


This Seasons Bounty


We absolutely love our growing garden, we spend hours just wandering talking to the vegetables, checking on their progress, picking leaves for the chickens and enjoying that self sufficient feeling of going food shopping down the garden daily!