29 Jun 2020

POT ROAST

As a Brit I’ve not really paid much attention to the American Pot Roast, I suppose because I regularly cook my Nan’s low and slow braised steak and kidney or slow braised pork shoulder in cider I’ve not felt the need for another meal in this area.  Well what have I been missing out on!  I purchased half a cow as you do and having a whole 5kg piece of chuck steak decided to portion off some to try pot roast.  What a glorious sumptuous spoon eating meal, full of decedent deep flavour, super moist and falling apart with lots of stock gravy and of course this had to be served with creamy buttery mashed potatoes, perfect, a really comforting soul satisfying bowl of food and as always for me eaten with a spoon!

Prep time 15 minutes / Cooking time 3 hrs unattended 


Ingredients 
(serves 4)

1 tbsp butter
1 tbsp olive oil
1 kg chuck steak as 1 or 4 steaks
100g pancetta diced
1 onion cut in to wedges
4 carrots peeled and roughly chopped
350ml red wine
500ml beef stock (bone marrow)
3 sprigs thyme
1 sprig rosemary

Perfect Mashed Potatoes 
1 kg Albert rooster potatoes peeled and halved
250g butter
1 tsp Himalayan sea salt 
1/2 tsp white pepper
1 tsp white wine vinegar 

In a Dutch oven add the olive oil and butter on a medium heat, add the chuck steak and sear both sides browning the steaks for a couple minutes, remove and reserve to one side, in the same pan add the pancetta and sear, remove and reserve with the chuck.  Next sear the onions and carrots until lightly caramelised, add the wine to the pan a deglaze scrapping off all the lovely caramelised flavour off the bottom of the pan, add the stock then add back all the reserved ingredients along with the thyme, rosemary, salt and pepper.  Bring to a gentle simmer for 2-3 hours on the stove top or pop in the oven at 170 C / 338 F.

30 minutes before your pot roast is ready, bring a large pan of seasoned water to a boil, add the potatoes and simmer for approx 25 minutes until fork tender, drain and leave to steam dry for 5 minutes, season the potatoes with salt and pepper.  Add the butter to the saucepan and place back on a low heat until melted, add the potatoes and vinegar, mash to your desired consistency, I like smooth my husband likes lumpy!  

To serve place a generous portion of the mashed potatoes piled high in the centre of your bowl, place the pot roast on top with some carrots and onions then spoon over a generous amount of the stock gravy and enjoy.


28 Jun 2020

JAPANESE YAKITORI HIBACHI KONRO BBQ

Sooo excited to get a Konro BBQ Grill with Japanese Binchotan charcoals for my birthday, I could not get the six foot grin of my face all day!  So I’ve had to learn how and what binchotan charcoal is and how to use this awesome charcoal that burns at crazy hot temperatures for five hours, can be re-used several time and you can BBQ INDOORS WITH!  That’s it I’m silly excited about all the Japanese, Korean, Asian, Malaysia and many more recipes that I’m going to cook.  My first recipe is just my simple Japanese marinaded chicken.

Marinating time 30 mins - 24 hours


Ingredients 
(makes 8 skewers)

2 chicken breast
3 tbsp dark soy sauce
1 tbsp mirin
1 tbsp brown rice vinegar
1 tsp sesame oil
2 tsp wasabi paste
1 pinch red chilli flakes

Dice the chicken in to equal inch square pieces, mix all the marinade ingredients together and add the chicken, leave to marinate for a minimum of 30 minutes but the longer you leave the more in-depth the flavour.  Soak your bamboo skewers in water for 30 minutes then skewer 3 or 4 pieces on to each skewer.  Cook for 2 minutes each side on the grill.

The Grill
Known as Yakitori, Hibachi or Konro Grills.  Made from diatomite fossilised remains of plankton that have compound down trillions of times and then when the sea levels lowered left compact diatomite.  Hand mined in Suzu Japan and formed in to blocks that are seamlessly joined together before being kiln fired at 1000 degrees to create a stronger tighter bbq grill which results in a strong ceramic grill that can withstand extreme temperatures for cooking, increasing a longer cooking and more even distribution charcoal burn, which is what Binchotan charcoal creates.


BINCHOTAN CHARCOAL 
Specifically Kishu Binchotan charcoal also known as Japanese white charcoal is made from Ubame Oak which is only found in Wakayama Prefecture Japan and the production is still an ancient art.  The final stages of producing Binchotan involves the Ubame being heated to incredibly high temperatures burning off all impurities leaving nothing but rock hard carbon, this carbon burns cleanly with no odour or smoke, making this the best charcoal for a clean no flavour tainted grilling.   This carbon is also used in water filter purification.

Binchotan produces a constant steady heat which burns for a very very long time around 5 hours.  Now if your not cooking for 5 hours don’t leave the Binchotan to carry on burning you can use a extinguisher pot to stop the coals and save for re-use many times over.  When cooking over Binchotan there are no flame flare ups which often taint food, instead when fat drips on to the charcoals it creates a whisper puff cloud of flavour from the fat.


Lighting Binchotan 
A charcoal starter or a Looflighter?  I’ve only cooked over wood fired pits and ovens, so this is a new experience for me CHARCOAL.  After a quick read I decided to try the Looflighter as it is organic and just uses hot air to start the coals off, my reason for this is to respect the integrity of the Binchotan.  I found this a little labouring in only as the fact I had to hold the heat wand for 5 minutes at the same spot, not a terrible chore really.  The Looflighter can be used indoors as well as outdoors.

The Charcoal Starter
This is a much easier way to start your coals off, but does require a naked flame heat source from a gas cooker or from a established open wood fire.  Place your Binchotan in the starter and place the starter on a open flame, leave for 5 minutes until the coals are glowing then transfer to your KONRO grill and your good to go.

As you can see the Binchotan burns very slowly and glows from the inside out.


The Binchotan Charcoal Extinguisher
This is a simple snuffer, basically you need to stop any oxygen to the coals, you can buy expensive professional pots but after some research I decided to make one with my garden kiln dried flower pots.  Worked a treat, job done and for £1.99.  The coals will be cold within 20 minutes, then store somewhere safe and dry.  Next time your firing up your grill place a few used Binchotan on the bottom with fresh charcoals in the middle and a few used on top this time you coals will fire up within 60 seconds to 3 minutes much faster than new Binchotan coals.


23 Jun 2020

SMOKED HADDOCK MORNAY TOPPED WITH A POACHED EGG

A decedent breakfast for that special weekend morning, Sunday’s are always something special in our home, a go slow day, time spent with the family cooking a sumptuous breakfast brunch then down the farm to feed the gang of pigs, goats and sheep, then depending on the time of the year out to a national trust garden and picnic or back home to hunker down for a lazy day with more good go slow let the oven do all the work cooking.

Cooking and prep time 30 minutes


Ingredients 
(serves 4)

6 new potatoes 
3 tbsp butter
1 glug olive oil
400g natural smoked haddock
200ml double cream
50ml milk 
200g spinach
1 clove garlic finely chopped 
100g + cheddar grated
25g emmental grated
25g gyuere grated
25g parmesan grated
1 glug white wine vinegar
4 eggs cracked into individual ramekins 
Himalayan sea salt 
Fresh ground black pepper 

Pre heat the grill.  Boil the new potatoes for around 20 minutes until tender, drain and slice chunky.  Heat a skillet and fry the sliced potatoes in 1 tbsp of the butter and a glug of olive oil until crispy brown on both sides.

Meanwhile bring the cream and milk to a almost simmer, add the smoked haddock and poach for 5 minutes until the fish is just holding together and ready to flake in big chunks.  Remove the haddock from the poaching liquid and reserve to one side.

Add all the cheese to the warm poaching liquid and gently whisk on a low heat until combined, taste and season with pepper and salt if needed.

Bring a saucepan of water to a gently just simmer, no bubbles, add the white wine vinegar, gently slip in the eggs from their ramekins and leave to poach for around 3 minutes, remove with a slotted spoon and drain on paper towel.

Heat another tablespoon of butter with the garlic, add the spinach and wilt for 30 seconds then take off the heat immediately.

Now assemble the dish, first rub the remaining butter in your large ramekins and season with salt and pepper, share the spinach equally between each ramekin, next divide and layer the potato between the ramekins, top with a couple of spoonfuls of the mornay sauce next layer the fish equally over the potato and again add a couple of spoonfuls of sauce.  Place under the grill/broiler for 3-5 minutes until gently bubbling and lightly browning, remove, top with your poached egg and enjoy immediately.

The Perfect Poached Egg


The Secret is in the Method
I have tried so many times to make the prefect poached egg, I whisked the vinegar water, cracked in the egg and more than often ended up with an egg white octopus and sometimes separate yolk all swirling around the pan!  After watching a cooking program I saw that I was not using a bowl to slip the egg in the simmering water, I was cracking the egg in directly, it also turns out that a the secret is not to create a vortex this is what causes the octopus strands, by gently slipping the egg in to the only just simmering water from a bowl your guaranteed a successful beautiful presentable encased poached egg...so simple when you know how.  

Now I do know a commercial trick for producing perfect poached eggs by the hundreds during service and that is to wrap the cracked eggs into oiled cling film, then poach in the cling film, guaranteed success every time.

Prep Time 5 minutes / Cooking Time 3-5 minutes

Ingredients
(one egg)

1 fresh egg cracked into a bowl
1 deep pan of simmering water
50 ml white wine vinegar

Bring the pan of water to a gentle simmer, add the vinegar and gently whisk to create a vortex in the centre and then pour in the egg from the bowl, the egg will swirl around gently with the vortex allowing the egg white to swirl around the yolk to create a perfect poached egg.  Cook gently for around 3-5 minutes depending on how runny you like your yolk,  

You can check the egg by removing with a slotted spoon and gently prodding to see how wobbly the egg is, the firmer the bounce back the more cooked the egg is.  Remember the poached egg will continue to cook for a minute once it is taken from the water and served.  

Get Ahead Eggs
You can poach your eggs ahead of time, once cooked, plunge the poached eggs in to a bowl of iced water to stop the cooking process, when your ready to serve gently place the eggs back into a pan of just simmering water for one minute to warm back through.

That's it Perfect...


17 Jun 2020

TARRAGON ROAST CHICKEN

A classic French dish that is easy to cook and delivers a impressive Sunday roast for the family, succulent whole roast chicken served with a chicken stock cream wine tarragon infused sauce.

Prep time 10 minutes / Cooking time 1 hour


Ingredients 
(serves 4)

The Roast Chicken and Stock Sauce
1 whole chicken
Himalayan sea salt 
Fresh ground black pepper 
1 glug olive oil
1 carrot roughly chopped
1 bulb garlic halved
1 leek roughly chopped
1 large onion roughly chopped
2 sticks celery roughly chopped
750ml water
300ml dry white wine
1 big sprig tarragon approx 4” long
1 clove garlic finely chopped
50g soft butter

The Tarragon Sauce
2 tbsp fresh chopped tarragon leaves
400ml chicken stock from roasting pan
300ml double cream

Pre heat your oven to 200 C / 392 F.  Mix the butter and garlic together, reserve to one side.  Season the whole chicken with olive oil, salt and pepper and brown off all over in a large deep roasting pan that has a lid.  Place the garlic butter and tarragon into the cavity of the chicken, add the rest of the ingredients into the pan, roast for 30 minutes with the lid on then remove the lid for the last 20 minutes.  Remove from the oven and leave to rest for 10 minutes.

Strain the stock from the pan, place 400ml in a pan and bring to gentle simmer, add the chopped tarragon and cream and warm through, don’t boil.  Taste and season if required.  I like to serve this with schmaltz roasted potatoes and smashed buttered peas.  Enjoy.


15 Jun 2020

HOW FAR CAN A CHICKEN GO...

14 sumptuous meals (7 meals for 2) from 1 chicken...
(also 2 meals for your dog or 4 meals for your cat !)

This isn’t the old age question of how did the chicken cross the road but a frugal passion of mine, how many meals can I make my family from that one chicken, turns out quite a lot!  Not only is this respect for the chicken but a great way to save money on your food bill and also sets up your families busy week night dinners or the packed lunches for the week ahead done!  Don’t panic but I brought a 2.6kg chicken for this amount of meals, £18.00 / $23.00.

Cook once (ish!) eat multiple meals this one chicken plus larder stock made 14 delicious and sumptuous meals

When it comes to choosing a chicken not all chickens are raised outdoors scratching and foraging as they would and with love and care and not all chickens are equal in good quality protein and healthy fats.  Buy the very best you can, your investing in a free outdoor happy life for that chicken.  If you can buy organic or genuine free range do, it is worth the chickens happy welfare and there is a remarkable difference in the quality of life the chicken has had, this also translates into the health of the meat your going to feed your family.

Buying the largest chicken can seem very expensive but it works out far more frugal in the long run, from a large chicken you will have your family Sunday roast dinner, then there will be left over meat that can be made in to 100’s of other meals, a decent amount of stock for soups, stews, risotto and a weeks amount of schmaltz (chicken fat) for daily use.


From 1 x 2.6kg organic chicken I made 14 meals !  

This chicken along with some larder staples made this selection of meals for two people.

Roast chicken with white wine garlic stock gravy
2 wings chefs perk
2 litres bone broth
Red Thai coconut noodle soup
White wine mushroom pea and Parmesan risotto
Chinese chicken curry
Asian chicken sesame salad
Chipotle chicken tacos (3 each)
Shredded chicken chow mien noodles
100g schmaltz chicken fat
2 meals for the dog or 4 for a cat

Some of the Secrets in the Pantry...

A well stock pantry of your families favourite staples will give you the freedom to make 100’s of different meals, you don’t have to stock all the ingredients at once as fresh is best.

Dry stock pantry items:  Basmati rice, risotto rice, various pasta, tortilla wraps, tacos, noodles, coconut milk, red Thai curry paste, harissa paste, black beans, tomatoes, flour, baking powder, pesto, puff pastry, peanut butter, olives, BBQ sauce, cider, white wine, honey, soy sauce, rice wine vinegars, sweet chilli sauce, wasabi, sesame oil, chillies, curry powder.  Various dried ground spices and herbs.

Fresh pantry items:  Eggs, cream, sour cream, milk, butter, cheese, Parmesan, schmaltz fat, ginger, garlic, lemon grass, five spice, onion, spring onions, coriander, parsley, red and white cabbage, broccoli, spinach, kale, mushrooms, carrots, potatoes, sweet potato, salad, lemons, apples, mangetout, peppers, leek, avocado, peas, and mustard.


So you’ve had the roast chicken, taken off all the meat and stored in the fridge, this will last in air tight containers for up to 5 days.  I take the wings off and roast separately as a chefs perk, while dinner is cooking and almost ready I get two hot crispy chicken wings that I toss in butter, hot sauce and some St Agur blue cheese !  Alternatively sometimes I vac pac the two raw wings and freeze, when I’ve got 12 or so I will cook Buffalo hot wings as a dinner, or I will roast the wings off with a mirepoix of vegetables and water and make a awesome roast chicken stock (approx 2 ltrs) which is a great base for so many more dinners.

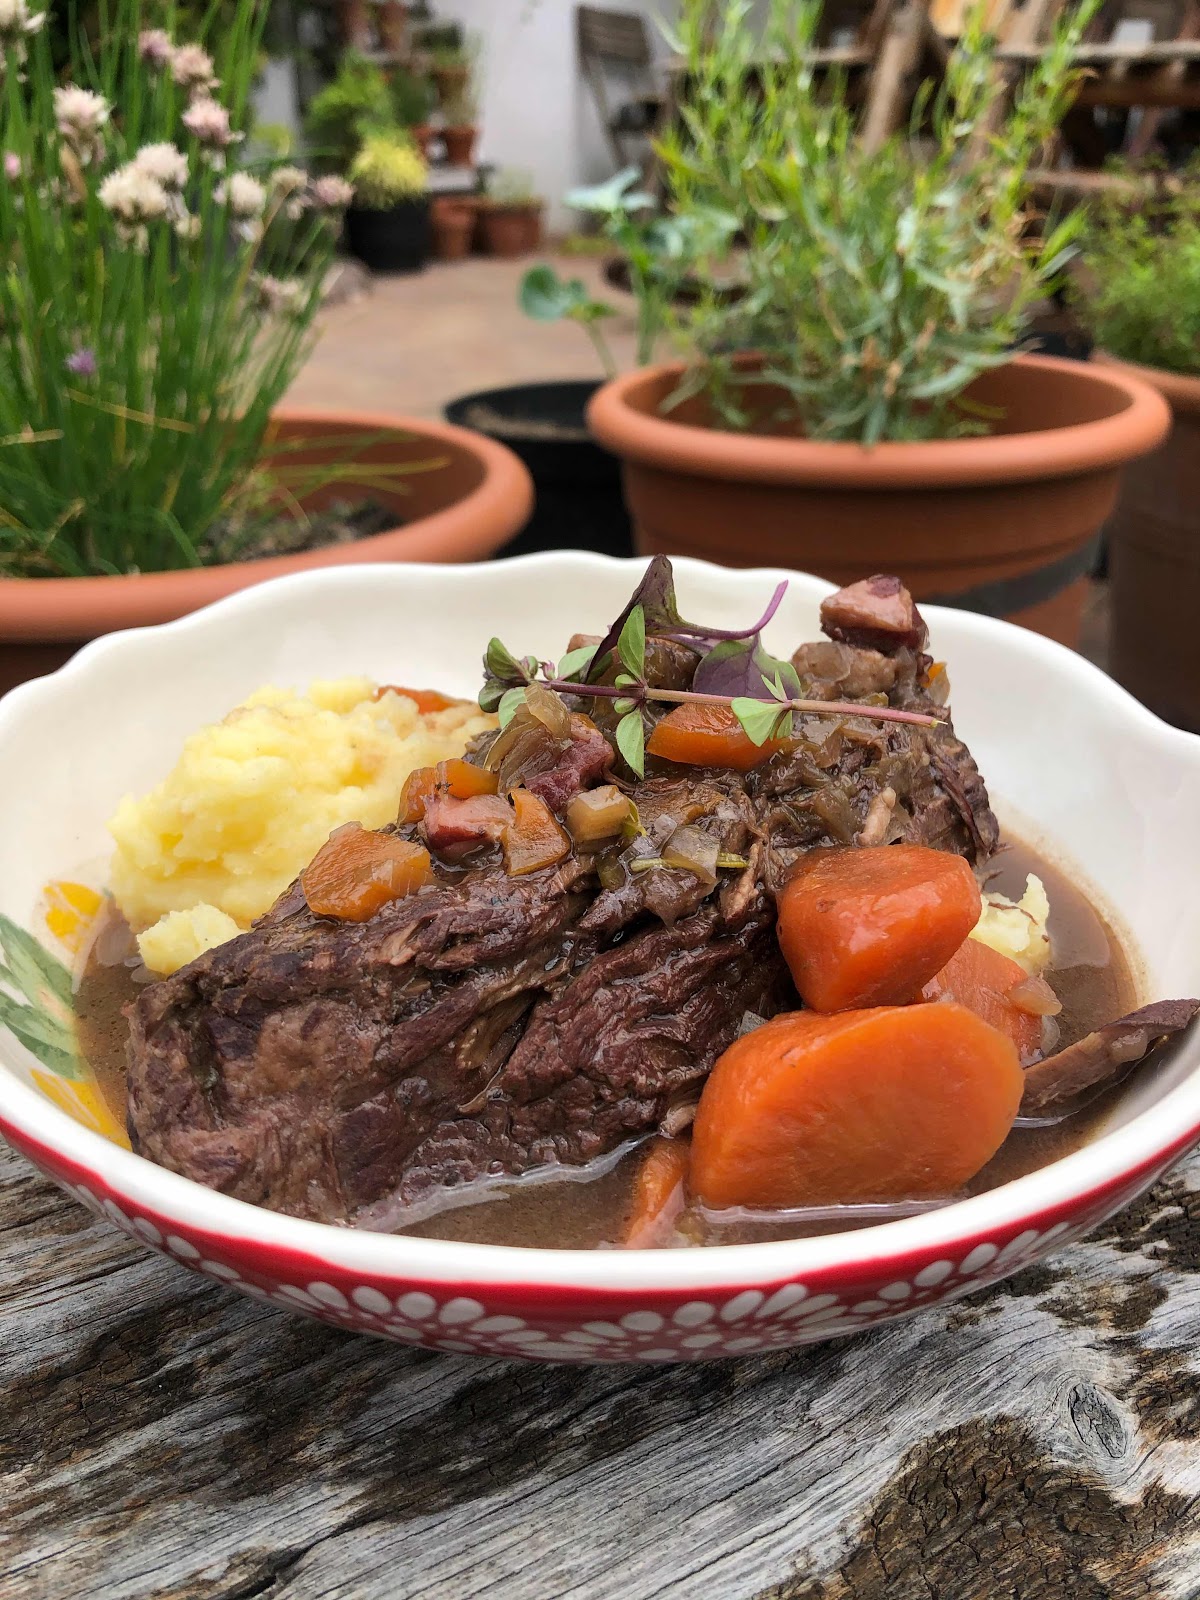
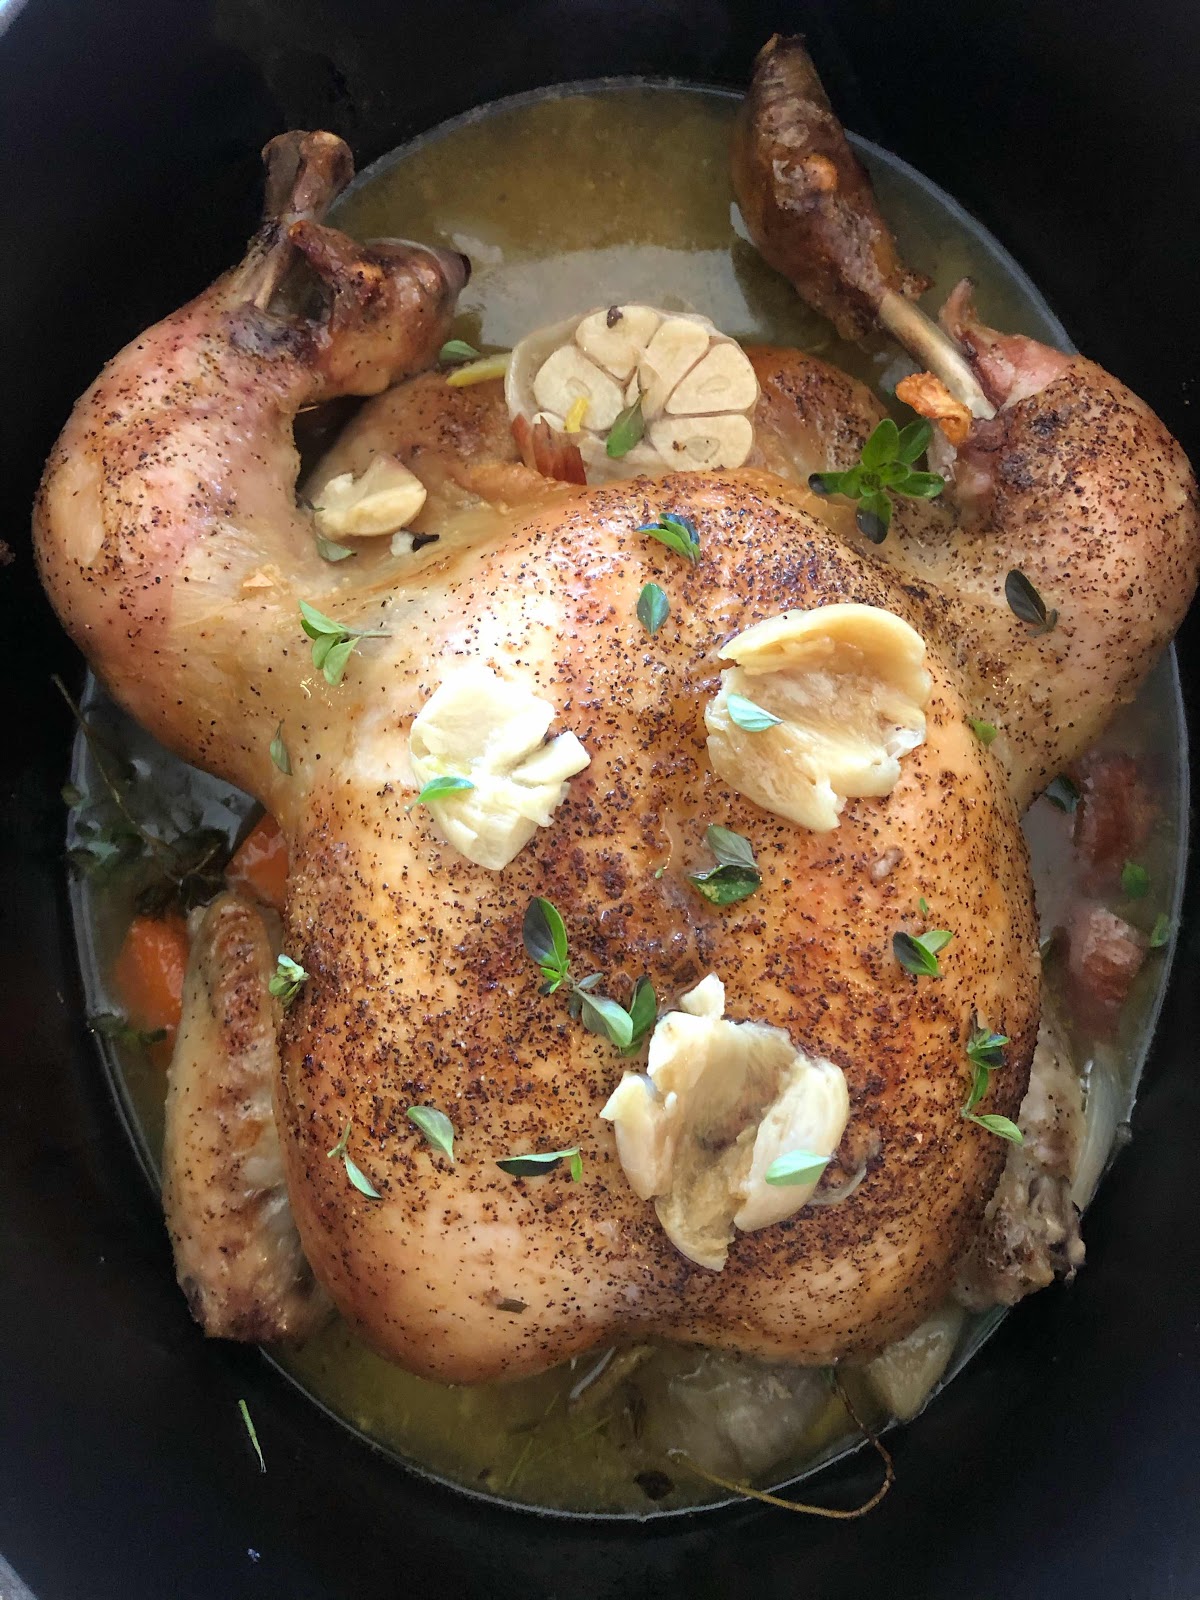
The Roast Chicken Dinner with White Wine Stock Garlic Thyme Gravy
(2 roast dinner meals)


Ingredients
(serves 2 - half a breast and 1 leg and thigh)

1 2.6 kg high welfare chicken
(1/2 large breast, 1 leg and 1 thigh served)
(2 wings roasted separately as buffalo wings)
2 glugs of olive oil
1 large onion quartered
1 carrot rough chopped
1 bulb garlic halved
1 leek roughly chopped
3 sprigs of thyme
1 bay leaf
1 sprig tarragon (optional)
2 tbsp parsley stalks chopped
1 tbsp butter
10 whole peppercorns
1 lrg pinch Himalayan sea salt
1 tsp ground black pepper
200ml dry white wine
200ml water

I find cooking this in a Dutch oven or chicken brick guarantees the most succulent juicy roast chicken every time.  Pre-heat your oven to 180 F / 356 F.  

Place the onion, garlic, carrot, leek, thyme, bay, peppercorns, tarragon, parsley stalks and butter in the pan, rub the chicken all over with the olive oil, salt and ground black pepper, place on top of the vegetables, pour in the wine and water, pop on the lid to your dutch oven (for 30 minutes ONLY) and place in the oven to roast for 50 minutes to 1hr 10 minutes (make sure to remove the lid half way through the roasting time to brown off and crisp the skin) until pierced juices run clear from the thigh or if using a probe the thickest part of the breast reaches 74C / 165 F.  This is how I cook my juiciest succulent chickens then rest for 15 minutes relaxing the chicken which allows all the juices to evenly distribute back in to the meat, also the resting juices are infusing into the glorious stock gravy.

The Roast Dinner White Wine Stock Garlic Gravy


Simply remove some of the tarragon, thyme and bay leaves, then blitz the cooking stock until smooth, pass through a sieve and return the gravy to the pan on a medium heat to keep warm, stir in a knob of butter and season to taste.  Serve over your roast chicken.

Removing the Left Over Meat of the Bones

1.5 breast meat 360g
1 leg
1 thigh
2 wings (eaten as buffalo wings)
All the little shreds of quality white meat off the carcass 
Bones of the carcass, skin and wings bones

Place all the removed meats in to a glass sealed container ready for the next meal.

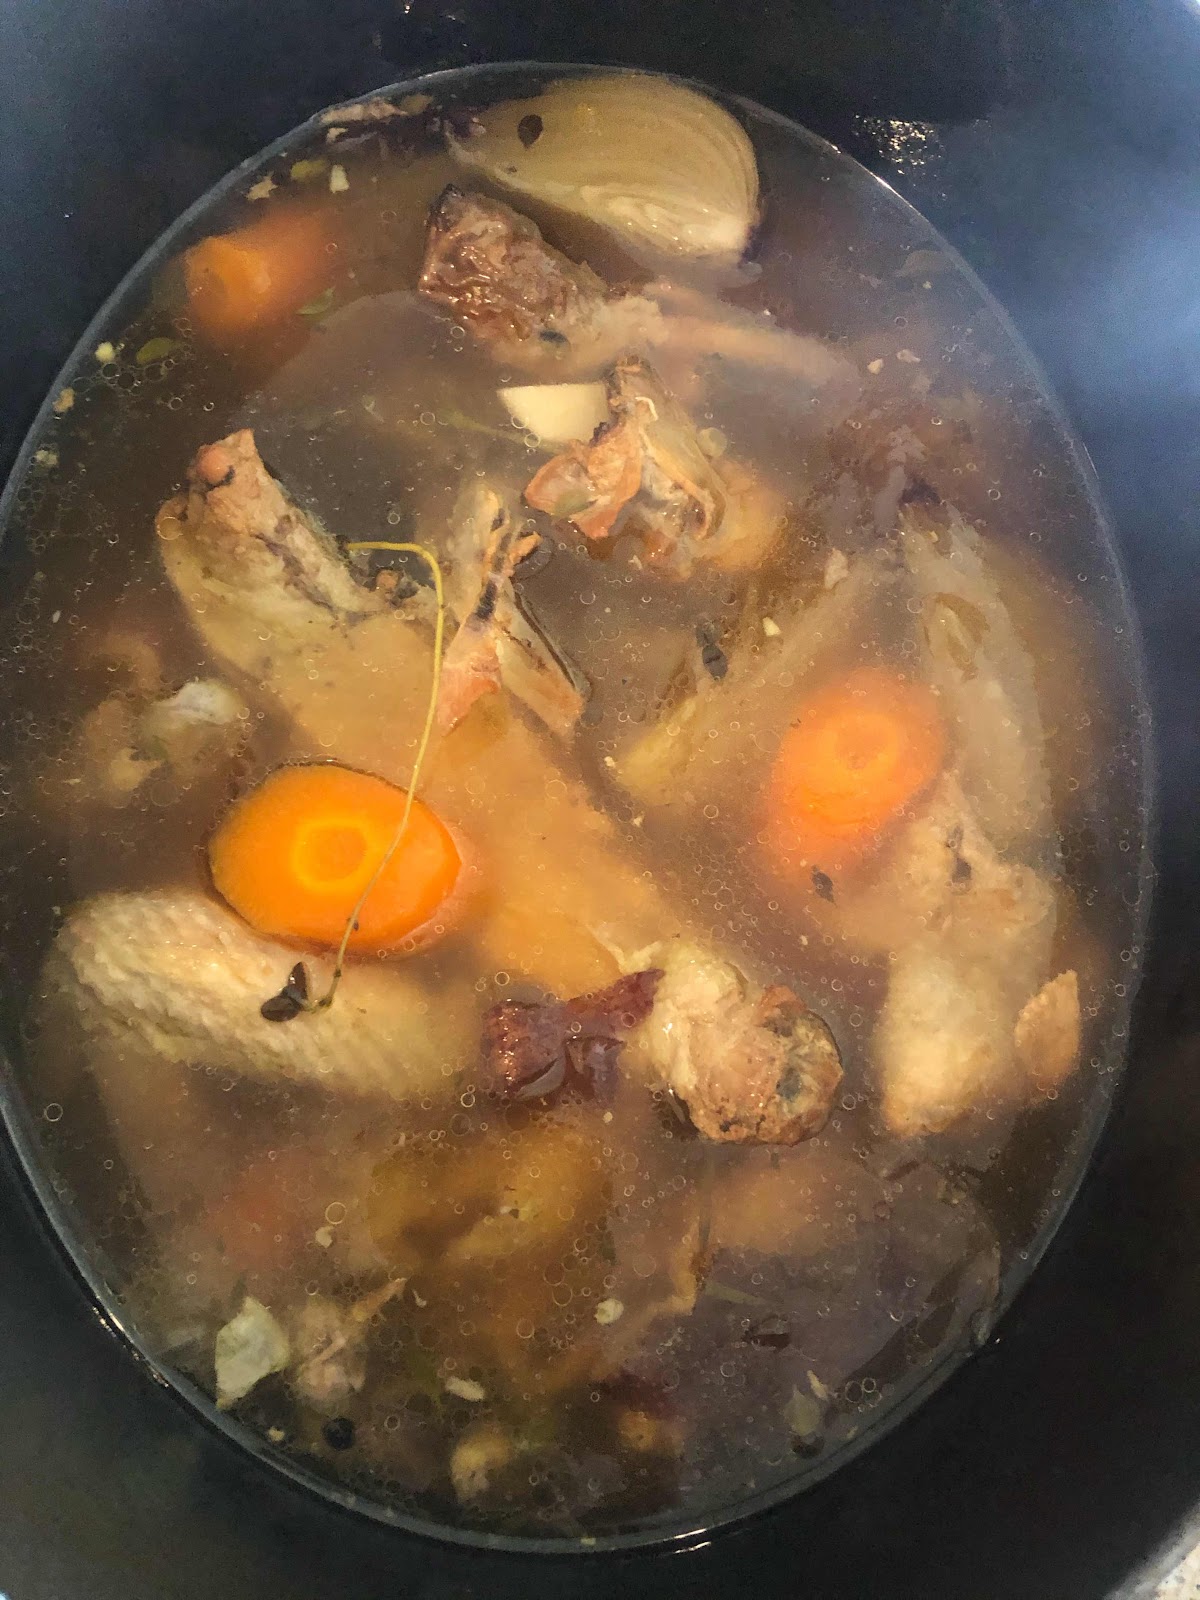
The Stock for Soups, Risotto, Curry and Gravy
A truly blessed thing is a saucepan of roasted chicken bone broth, not only full of depth of flavour it has great health properties for your gut and immune health.  This stock from the left over bones and a few stock vegetables creates 2 litres of food that most people just discard, 2 minutes preparing and 1 hour in the oven unattended and Ta-Da glorious stock.  Let’s start at the beginning...

Roast Chicken Stock 
The King of Stocks...


Ingredients 
 (makes 2 ltrs)

1 left over roast chicken
1 onion quartered 
1 carrot roughly chopped
1 bulb garlic halved
1leek roughly chopped
2 ribs celery roughly chopped
10 whole black peppercorns 
I large pinch Himalayan sea salt 
1 bay leaf
3 sprigs of thyme
2.5 ltrs water

Place all the chopped vegetables in the bottom of a deep roasting tin then place the left over chicken bones, skin and any resting juices, jelly and fat on top, season with salt and roast in the oven 180 C / 356 F for 30 minutes until the bones are browned off.  Pour in the water, add the peppercorns, bay and thyme and place back in the oven for a further 30 minutes.  Remove the roasting tin from the oven and using a potato masher crush all the ingredients several times releasing their maximum flavour in to the stock.  Strain off through a sieve and place in the fridge to set.

Dog or Cat Dinners
Pick off all the meat and braised vegetables from the stock braised bones, this makes 2 dinners for a medium Cocker Spaniel or 1 meal for a Labrador or in our case a snack for our Great Dane!  If your a cat owner this will give your cat 4 lovely chicken and jelly meals.  

Schmaltz Chicken Fat
Once the stock is cold skim off the schmaltz (fat) from the top of the set jelly stock and reserve in a ball mason jar in the fridge for use when needed, this makes the best roast chicken fat potatoes!

Concentrated Chicken Stock Jelly


If you reduce your chicken stock down on rolling simmer until halved, once cooled you will end up with a strong intense chicken flavoured concentrated jelly stock.  This can be used to infuse flavour to gravies, soups, broths and rice dishes.  I make this jelly to use when I’m not having lots of soups whereas I would normally keep the volume of my stock broth.

White Wine Mushroom Pea Parmesan Risotto 
Sumptuous gorgeous creamy comforting food, a delight and for me to be eaten with a spoon, this maximises the ratio of how much I can eat in each mouthful !  This is a hug in a bowl, rich creamy white wine parmesan, mascarpone and pea risotto, made with a deep chicken stock maximising full flavour and one of my favourite recipes.  Ready in 20 minutes and easy to make a great dinner to impress your family.  I cook my risotto the traditional way constantly stirring for 15-20 minutes because I love cooking and being more in control of the silky soupy finish, however you can also cook risotto unattended you just need to stir continuously for the first 3 minutes only then add all the stock in one go and leave to cook!

I brought my risotto rice from Valencia in Spain from a deli shop on line, this risotto rice is the creamiest most decedent rice I have ever eaten.


Ingredients 
(serves 2)

100g left over chicken breast shredded
400g risotto rice 
1 tbsp butter
1 tbsp olive oil
1 shallot finely diced
1 cloves garlic finely diced
4 chestnut mushrooms finely diced
100 ml  good quality dry white wine
5oo ml + hot chicken stock
100g mascarpone cheese
1 cup petite pois peas
1 cup fresh grated Parmesan 
1 tbsp butter
Himalayan sea salt 
Fresh ground black pepper 

Heat a deep pan medium hot, add the olive oil and butter, gently soften the shallots and garlic for 10 minutes, add the mushrooms and soften for a further 3 minutes, next add the risotto rice, stir well coating in the onion and garlic mix, cook for a couple of minutes stirring all the time.  Add the white wine and reduce by half.  Next start adding a ladle  of your hot stock and stirring until absorbed, then repeat adding another ladle of stock, keep repeating for around 15 minutes until the risotto rice is cooked, add the shredded chicken, now I like my rice just cooked but not too al dente (slight bite to the rice), add the peas, Parmesan, mascarpone and stir well to combine, taste and season with the salt and pepper, add the tbsp butter and stir in.  Lower the heat and let the risotto rest for a couple of minutes before serving, this is best served immediately.

A beautiful risotto should be silky soft and have a slightly fluid movement to its consistency, not thick or stodgy.

Red Thai Coconut Noodle Soup


I cannot shout out enough how fragrant and gorgeous this home made paste is, however sometimes I just need to be speedy and I always keep some organic Tom yum, harissa and red Thai curry paste jars in my pantry.

Your Own Paste or Not...
Ingredients
(makes 4 tablespoons worth)

3 tbsp whole white peppercorns
1 flat tsp cumin seeds ground
1 flat tsp coriander seeds ground
8 dried medium hot chillies optional
(soaked in warm water)
1/2 tsp sea salt
6 cloves garlic
1 shallot finely diced
1 tbsp finely chopped bashed lemongrass stalk
2 tbsp coriander stems finely chopped
1 tbsp minced galangal
1 kaffir lime zested


This is the fun part, you can skip this and blitz all the ingredients up in a blender, but I urge you not to, it changes the flavour of the paste and is not as fragrant.  Place all the dry ingredients in your pestle and mortar and grind to a powder then add the rest of the ingredients and pound away until you have a lovely smooth ish paste, this took my husband (I borrowed his muscles!) around 10 minutes.

Place in a air tight jar and keep in the fridge for up to 2 weeks or until needed.  Most recipes for four servings require 2-4 tablespoons of the paste according to your taste.

Red Thai Coconut Soup
Ingredients 
1 ltr chicken stock, bone broth
1 can coconut milk
1 tbsp tom yum or more to taste
1 tsp harissa paste
1 lime juiced
1 tsp palm sugar (optional)
1 sweet potato diced and boiled
1 tsp turmeric
2 spring onions
1 red chilli finely diced
3 tbsp chopped coriander
2 big handfuls spinach
1 bunch watercress
6 spears asparagus
1 bunch broccoli florets
100g cooked noodles

Bring the stock to a gentle simmer and add all the ingredients, simmer for a couple of minutes so that the broccoli and asparagus are cooked, taste and adjust the seasoning with sea salt, lime juice and palm sugar if needed.  Enjoy.

Chipotle Chicken Tacos and Hot Sauce

These are so cheeky and mouthstuffingly gorgeous, a lovely soft but toasted corn taco stuffed with moist leftover chicken, crisp lettuce, pickled jalapenos, shredded cheese, a drizzle of chipotle sour cream, lime and hot sauce, finish off with a sprinkle of coriander leaves.

These were a really quick assemble from the leftovers in the fridge, great for a quick meal that eats like you slaved over a stove.  This is the sort of Ta da meals you want to pull out of the fridge when unexpected visitors drop by, keeping your culinary genius status.

Prep time 5-20 minutes (fridge or freshly made) / Cooking time if freshly made 10 minutes


Ingredients 
(3 tacos each for 2 people)

6 soft corn tacos
100g left over shredded chicken breast
1/4 iceberg lettuce finely shredded
1/2 red onion finely diced
1/2 jar pickled jalapeños
1 cup shredded cheese (mexi mix)
6 tbsp sour cream
1 tsp chipotle adobo sauce
1 lime halved
1+ glug hot sauce (optional)
Fresh coriander rough chopped

Lay your tacos (3) on each plate and then assemble your layers of ingredients, I do have a specific order, this is so that each bite gets all of the flavours and also keeps the ingredients crisp, I like to layer the lettuce first, then the shredded chicken and drench this in hot hot sauce, top this with the shredded cheese, sometimes I pop this under the grill for a minute to melt, not always, just depends on time and if I’m in the mood for gooey melted cheese!  Next might be a little more hot sauce, then the jalapeños, red onion and finish off with the chipotle sour cream lime drizzle and fresh coriander sprinkled over to finish.

That's it enjoy these gorgeous tacos...

Chinese Chicken Curry 

Ingredients 
160g left over chicken breast shredded
1 tbsp olive oil
1 tbsp soy sauce
2 tsp corn flour
1 small onion finely chopped
1 tbsp fresh grated ginger
3 cloves garlic finely chopped
1 green pepper chopped
1 tbsp Jamaica curry powder
1 tsp turmeric
1/2 tsp Chinese five spice powder
500ml chicken stock 
Himalayan sea salt to taste
2 tbsp fresh copped coriander 

Mix the left over chicken with the soy sauce and corn flour and set aside.  Heat the olive oil and soften the onion, ginger and garlic for five minutes, add the curry powder, turmeric and five spice and cook for one minutes releasing all the flavours, add the marinated chicken and chicken stock, bring to a gentle simmer for two minutes, the sauce will thicken, add the green peppers and cook for a further two minutes, sprinkle over the coriander and season with salt to taste.
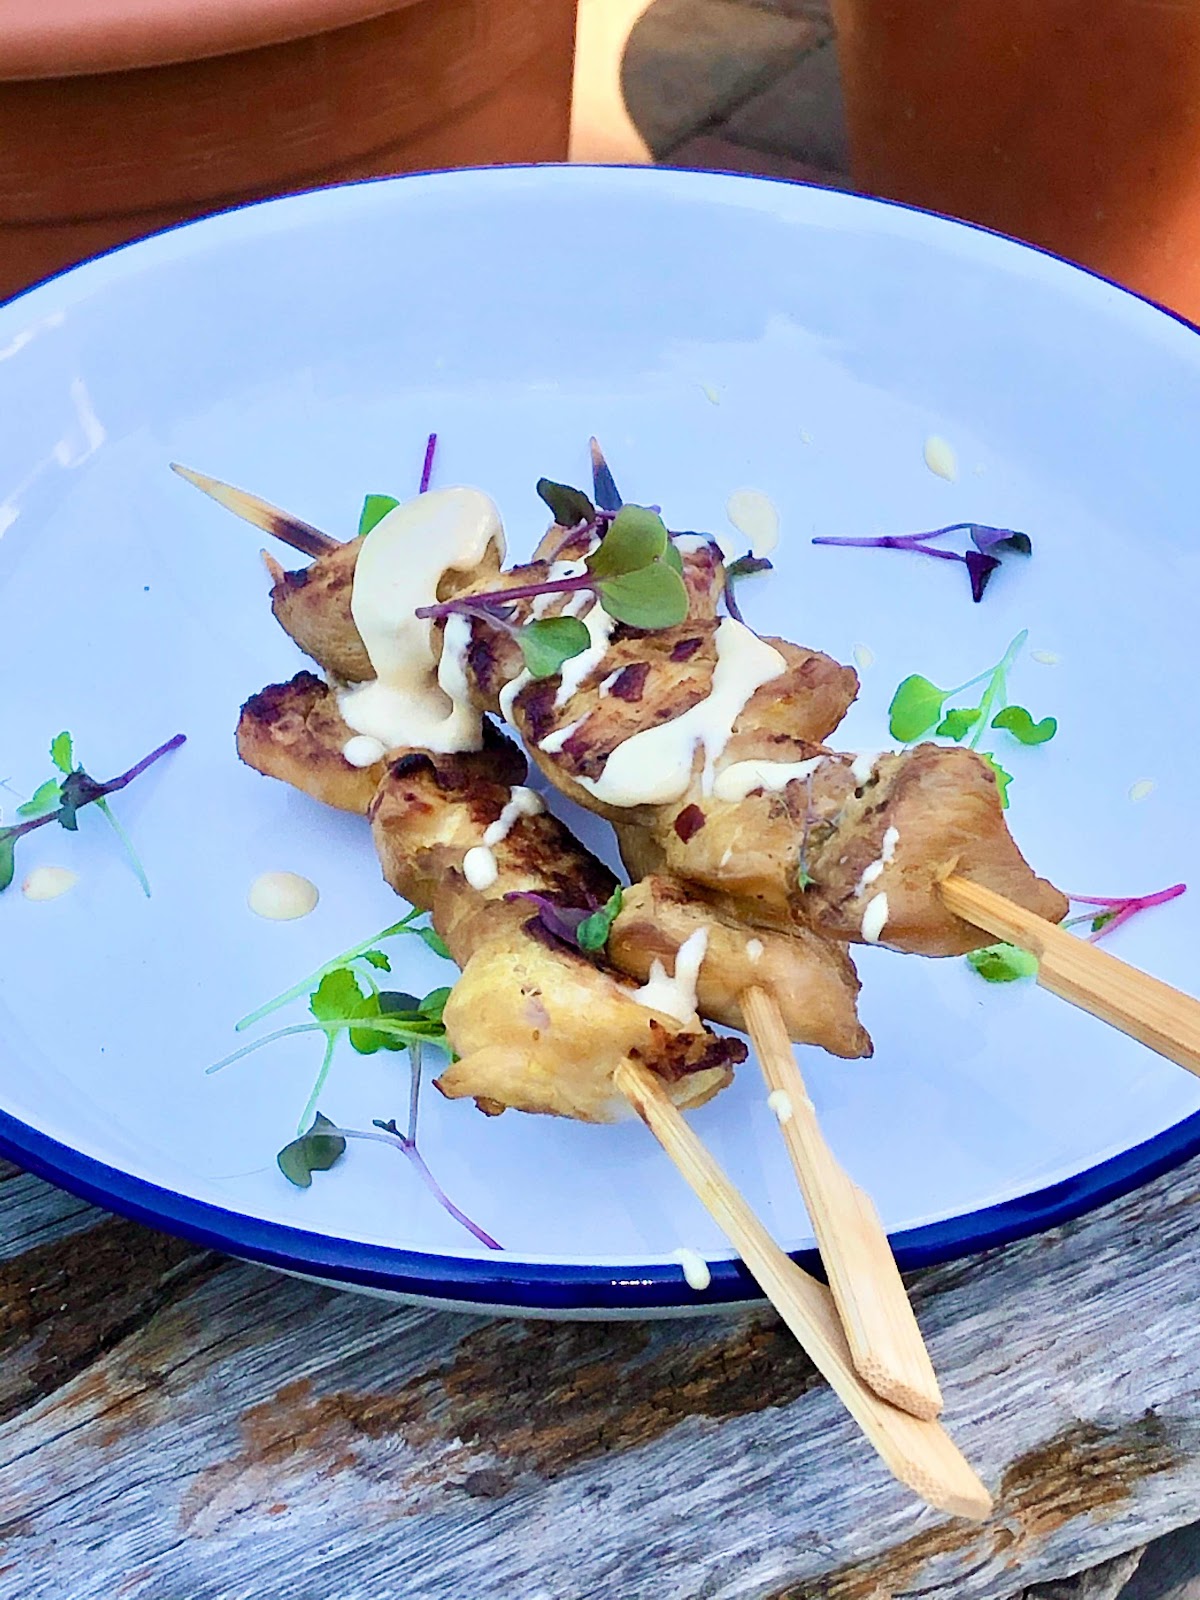
Asian Chicken Salad

Ingredients 

1 chicken thigh shredded
I clove garlic grated
1 tsp grated ginger
2 spring onions finely chopped
1 tbsp soy sauce or tamari (gluten free)
1 tsp sesame oil
1 tsp mirin
1 tsp brown rice vinegar
1 tsp toasted sesame seeds
1/4 tsp five spice
1 large carrot julienned
1/4 cucumber julienned 
1/2 iceberg finely shredded
1 small red onion finely sliced
100g fresh bean sprouts
1 cup red cabbage finely sliced
2 tbsp chopped fresh coriander
1 lime juiced (optional)
Himalayan sea salt
Fresh ground black pepper 
1 tbsp crushed peanuts

In a pestle and mortar bash the garlic, ginger and spring onions together then add the soy, sesame oil, rice wine vinegar and mirin, stir to combine and reserve to one side.  In a large mixing bowl toss all the other ingredients together mixing well, don’t season with salt and pepper until you have poured over the reserved marinade and tasted, season if required.

Chow Mein Stir Fry


Ingredients 
(serves 2)

Stir Fry
300g cooked chow mein noodles 
Remaining chicken leg meat shredded & shreds of chicken from the carcass
1 tbsp coconut oil
1/2 tsp sesame oil
2 tbsp fresh ginger sliced
1 fresh jalapeño sliced
1 carrot julienned
1/4 red cabbage finely sliced
1/4 white cabbage finely sliced
100g fresh bean sprouts
1/2 red pepper sliced
1/2 green pepper sliced
1 tbsp toasted sesame seeds
2 spring onions finely sliced
1 small bunch fresh chopped coriander
Marinade
75ml soy sauce or tamari gluten free soy
50ml shaoxing wine
1tbsp mirin
1 tsp brown rice wine vinegar
2 tsp honey (optional) or sweet chilli sauce
1/2 tsp wasabi paste
1/2 tsp sesame oil 
1 tbsp grated ginger
1/2 tsp fresh grated turmeric
1 clove garlic grated
3 spring onions bashed to a paste

In a pestle and mortar bash the spring onions, garlic, ginger, turmeric and wasabi to a paste, add the rest of the marinade ingredients except the honey, mix together and pour over the chicken and leave to marinade while you prep the rest of the ingredients.

Noodles
Cook these before you start the stir fry.
Bring a pan of water to a simmer drop the noodles in and cook for around 2 minutes, drain, run under cold water then drizzle over a little sesame oil and reserve to one side.

Stir fry
Heat your wok on a high heat, add the coconut oil and the marinated chicken with all the marinade, stir fry for a couple of minutes until the chicken is heated through, remove to a bowl and keep to one side, now add in all the stir fry vegetables except the bean sprouts and stir fry for a couple of minutes, add the bean sprouts, noodles and the reserved chicken and resting juices, toss through, stir through the sesame oil and honey, sprinkle over the toasted sesame seeds, fresh coriander, spring onions and serve.


11 Jun 2020

SPANISH GARLIC POTATO CHORIZO TORTILLA

Such a simple dish the first mouthful sends me straight back to a old bodega in a little village in Spain, goats crossing the road and chickens wandering around, I’m sitting at the bar watching all the activities of the bodega with a glass of wine, Serrano ham and this gorgeous tortilla, no one speaks English and the bar man is writing our bill in chalk on the wooden bar top in front of us each time we order something else It is just magical.

Beautiful soft and slightly crisped garlic saffron chicken stock infused potatoes pillowed in a chorizo and egg tortilla, this just melts in the mouth soft, light and fluffy.  By not cooking the chorizo first the chorizo’s gorgeous paprika and pork fat oils ooze out and swirl around randomly through the tortilla some infuse the potatoes and some infuse the eggs every bite is a delight.

Prep time 10 minutes / Cooking time 30minutes


Ingredients 
(serves 2)

1 glug olive oil
1 tbsp butter
8 eggs beaten
100g cooking chorizo
1 large floury potato small diced
1 ltr chicken stock
3 strands saffron 
6 garlic cloves finely sliced
1 small white onion finely diced
1 handful kale or chard finely sliced
Himalayan sea salt 
Fresh ground black pepper 

Bring the chicken stock to a simmer add the saffron and the diced potatoes, simmer for 5 minutes only remove from the stock with a slotted spoon and reserve to one side.  Keep the saffron chicken stock as a base for a soup.

Season your beaten eggs with sea salt and black pepper

Heat a cast iron skillet medium hot add the olive oil and butter once melted add the onion and garlic and soften for 5minutes then add the potatoes and pan fry for a further 5 minutes so that the potatoes take on all the flavours, add the kale, chorizo stir to combine and then turn the heat down to low and pour in the eggs, leave to gently slowly cook when there is wobble but not runny eggs place a plate on top of the skillet and turn the skillet over so that the tortilla is now on the plate, then slide the tortilla back in to the skillet to finish cooking the top which is now the bottom!  Alternatively you can pop the skillet under the grill to finish cooking the top.

That’s it serve immediately and enjoy.


5 Jun 2020

WHITE WINE MUSHROOM PEA PARMESAN RISOTTO

Sumptuous gorgeous creamy comforting food, a delight and for me to be eaten with a spoon, this maximises the ratio of how much I can eat in each mouthful !  This is a hug in a bowl, rich creamy white wine parmesan, mascarpone and pea risotto, made with a deep chicken stock maximising full flavour and one of my favourite recipes.  Ready in 20 minutes and easy to make a great dinner to impress your family.  I cook my risotto the traditional way constantly stirring for 15-20 minutes because I love cooking and being more in control of the silky soupy finish, however you can also cook risotto unattended you just need to stir continuously for the first 3 minutes only then add all the stock in one go and leave to cook!

I brought my risotto rice from Valencia in Spain from a deli shop on line, this risotto rice is the creamiest most decedent rice I have ever eaten.


Ingredients 
(serves 4-6)

750g risotto rice 
1 tbsp butter
1 tbsp olive oil
1 shallot finely diced
2 cloves garlic finely diced
8 chestnut mushrooms finely diced
150ml good quality dry white wine
1.5 ltr + hot chicken stock 
250g mascarpone cheese
1 cup petite pois peas
1 cup fresh grated Parmesan 
1 tbsp butter
Himalayan sea salt 
Fresh ground black pepper 

Heat a deep pan medium hot, add the olive oil and butter, gently soften the shallots and garlic for 10 minutes, add the mushrooms and soften for a further 3 minutes, next add the risotto rice, stir well coating in the onion and garlic mix, cook for a couple of minutes stirring all the time.  Add the white wine and reduce by half.  Next start adding a ladle  of your hot stock and stirring until absorbed, then repeat adding another ladle of stock, keep repeating for around 15 minutes until the risotto rice is cooked, now I like my rice just cooked but not too al dente (slight bite to the rice).  Add the peas, Parmesan, mascarpone and stir well to combine, taste and season with the salt and pepper, add the tbsp butter and stir in.  Lower the heat and let the risotto rest for a couple of minutes before serving, this is best served immediately.

A beautiful risotto should be silky soft and have a slightly fluid movement to its consistency, not thick or stodgy.


1 Jun 2020

ULTIMATE BACON CHEESE AND JALAPEÑO CHUCK STEAK BURGER

Come to Mama!

Every bite of this juicy flavoursome chuck steak burger was divine, the awesome flavour from the 80/20 chuck steak, twice minced with sweet-cure unsmoked bacon, jalapeños, salt and black pepper, flat top seared and loaded with American cheese melted under a steam cloche then topped with crispy bacon, jalapeños, red onion, tomatoes and a burger ketchup sauce, wrapped in a iceberg leaf as I’m gluten free is a private moment of joy!  I do miss those days where I would have stuffed this beauty in a butter basted bacon fat pan toasted brioche bun!


Ingredients 
(makes 4)

The Burger
1kg chuck steak minced
24 rashers unsmoked streaky bacon
480g (240g drained) jar pickled jalapeños
Himalayan sea salt 
Fresh ground black pepper 
Olive oil
8 slices cheese
1 red onion thickly sliced in whole rounds
1 beef tomato sliced in to 4
1 iceberg or 4 brioche buns
Burger Sauce
4 tbsp mayonnaise 
2 tbsp tomato ketchup 
1 tsp apple cider vinegar 
1 tsp Dijon mustard

Dice 12 rashers of bacon and place in a large bowl along with the chuck mince, salt, pepper and half of the jar of jalapeños chopped.  Mix well by hand, divide in to 4 and form into patties.  Place a cast iron skillet on to a medium high heat and cook the remaining 12 rashers of the bacon crispy, reserve to one side.

In the same pan add a dash of olive oil once medium hot place your 4 burgers and sear for 3 minutes without touching, turn over and cook for a further 2 minutes, place 2 cheese slices on top of each burger and 3 rashers of bacon then add 100ml water and pop a lid on to steam the burgers for 1 minute keeping all the moisture in and melting the cheese.  

Take off the heat and assemble in your iceberg leaves with the burger sauce first, followed by the burger topped with the jalapeños, red onion and tomatoes and a final extra drizzle of burger sauce.

If you are using brioche buns, in the skillet that you cooked the bacon and burgers, add a large tbsp butter then toast the buns in this bacon butter burger fat until lightly golden brown.