31 May 2021

BEEF CHIMICHANGAS

My family love these chilli beef crispy chimichangas loaded with refried beans, fresh jalapeños and lots of melting tex mex cheese makes every crispy bite a delight.  I always make a double batch as these go so fast and making a double batch of the chuck steak chilli beef filling gives another dinner done for the week ahead all in the same preparation that can be served as chilli con carne or a great filling for Taco Tuesdays.

Prep time 30 minutes / Chilli Cooking 2 hrs / Frying Chimichanga 15 minutes


Ingredients 
(as chilli con carne serves 6-8 people)

Chilli Beef
2 dried ancho chillies
2 dried de arbol chillies
2 dried guajillo chillies
olive oil or beef drippings
1 large white onion diced
1 large red pepper diced
2 fresh Fresno chillies
2 Anaheim peppers diced
3 tbsp masa harina 
1 kg ground chuck steak
1 kg chuck steak diced
4 cloves of garlic finely diced
1 tsp ground cumin
1 tsp dried oregano
1/4 tsp paprika (smoked optional)
1/2 tsp cayenne pepper
1 tsp Himalayan sea salt (to taste)
1 tsp fresh ground black pepper
2 bottles amber beer like blue moon
2 ltrs beef stock

Chimichanga Ingredients 
1 pack filo pastry
1 can refried beans
500g tex mex grated cheese mix
2 ltr vegetable oil for frying

First make the chilli beef…
Heat a good glug of olive oil or beef drippings medium hot in a deep saucepan, brown the diced chuck steak, remove then add the garlic to the pan along with the chuck steak mince and brown off, remove from the pan, while the chuck is browning in a dry pan toast the ancho, de arbol and guajillo chillies then take off the heat and cover with 250ml of boiling water and leave to soften for 10 minutes, add to a blender and blitz to a smooth sauce, next add some more olive oil or beef drippings to the pan, add the diced onion, pepper, fresno and Anaheim peppers to the saucepan and soften for 10 minutes then add the paprika, cayenne, oregano, cumin and masa harina to the softened onions and cook for a further five minutes, add the browned off chuck steak and mince to the pan along with the blitzed chillies, stock and beer, season with the salt and pepper.

Place in the oven in lidded casserole dish or cook on the stove over a medium low heat for 2-3 hours until the diced chuck steak is fall apart tender, season with salt and pepper to taste.

To assemble the chimichangas…
Un roll the filo pastry and cover with a damp tea towel keeping damp, filo pastry dries out very fast and then cracks and can’t be used as easily.  Lay out one sheet, at the top in the centre place a spread a tablespoon of refried beans, a generous spoonful of chilli beef and top with grated cheese, start to roll over the pastry, when half way down the length of the sheet fold the left and right side over the centre, then finish rolling up the chimichanga, brush a little water at the end of the pastry to glue the seam, repeat with the remaining pastry.

Heat your oil to 180 C, and fry the chimichangas two at a time for 3-4 minutes until crispy golden brown, drain on paper towel, these are best served hot but can be served cold.


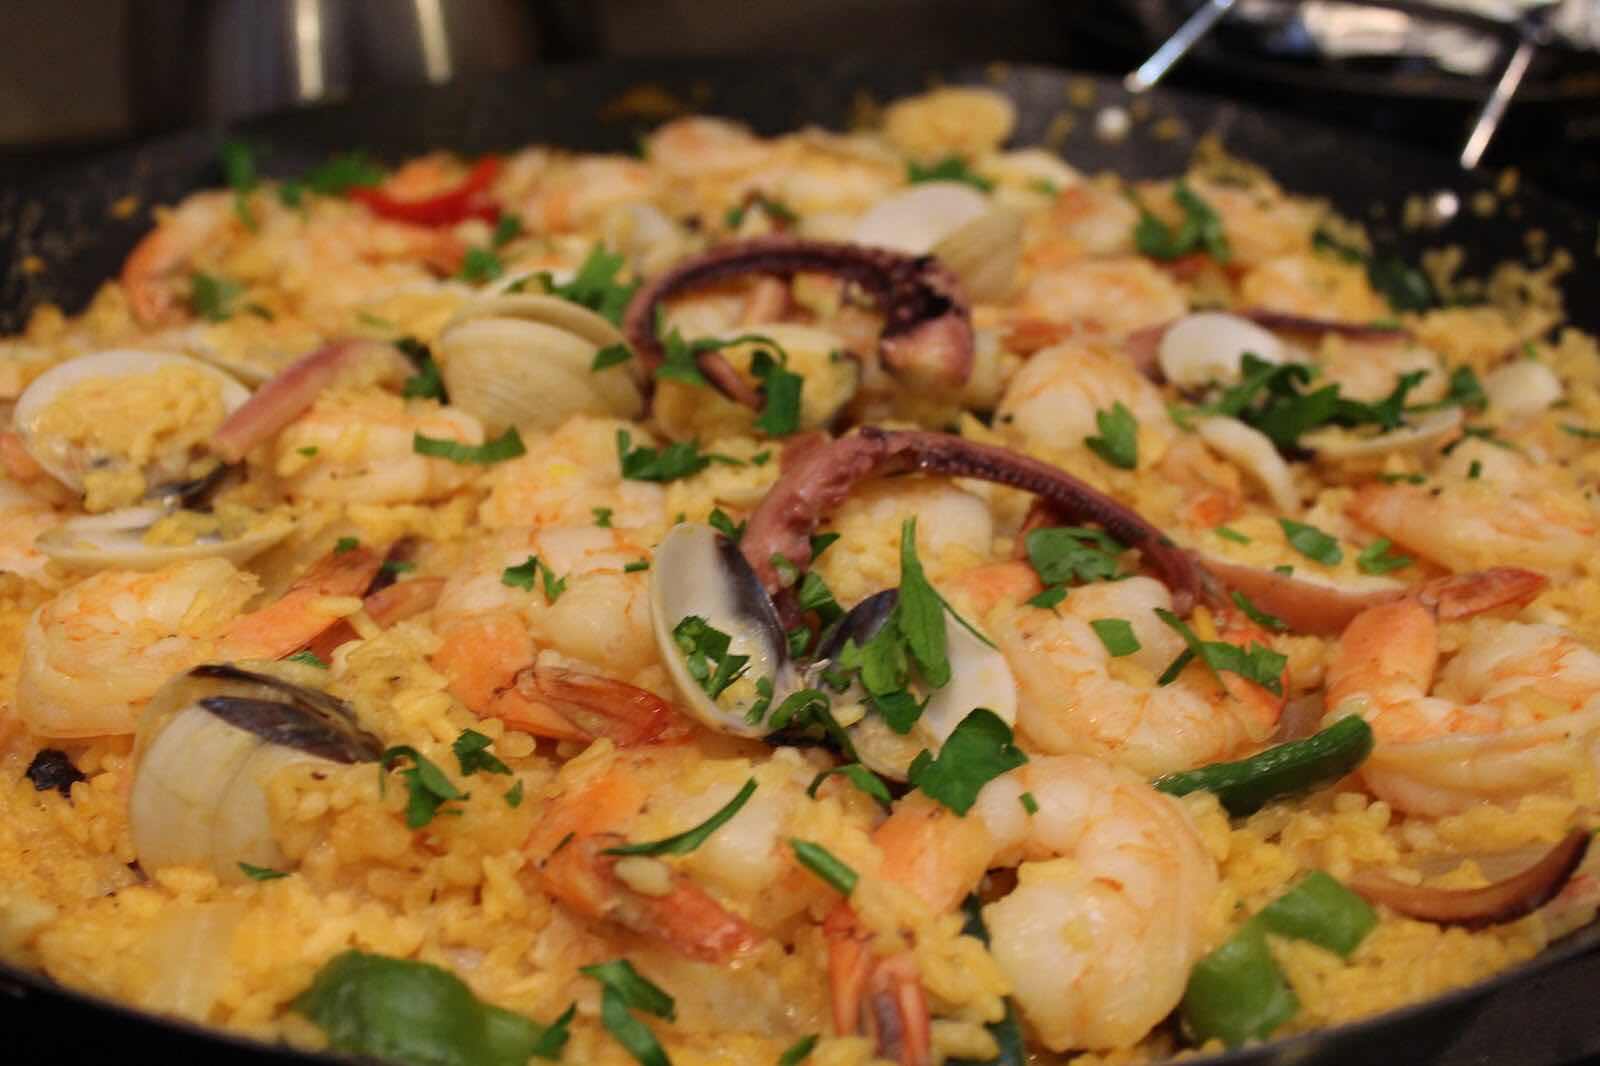
SEAFOOD PAELLA

This is a wonderful dish, one to take your time over and really enjoy the preparation, cooking and eating!  Slow stock braised rice layered with succulent shrimp, clams, squid and octopus sautéed in garlic nutty butter this is a true feast.  The best paella rice in the world is Catala Bomba variety, a short grain rice that carries the DOP, destination of origin Arroz Bomba where the only true paella rice is grown.  This rice absorbs the flavoursome stock and plumps up beautifully so every spoonful is a delight.

Preparation time 10 minutes / Cooking time 30 minutes


INGREDIENTS
(serves 6-8)

1 large glug of olive oil
1 tbsp butter
 1 large onion fine diced
4 cloves of garlic fine chopped
1 pint of paella rice
2-3 pints of fish or chicken stock
1 tsp saffron threads
500g fresh clams
50 fresh raw prawns
500g octopus legs cooked
1 squid cleaned and sliced raw
1 red & green peppers 1" squared
small bunch fresh parsley
salt and pepper
 
 Heat the oil and butter in a paella pan or a saucepan, soften the onion and garlic for 5 minutes not allowing them to colour then add the rice and stir for a few minutes, add the saffron and then start to add the stock, a few ladles at a time until almost absorbed, keep gently stirring, repeat this until the rice is cooked and has absorbed all the stock, (normally 2 to 2.5 pints) and the rice is just soft to the bite.

Add all the seafood and peppers and gently stir in, cook for approx 5 minutes, taste and season with salt and pepper then sprinkle over the parsley and serve.


8 May 2021

DISNEY’S SPRINGS ORLANDO BOATHOUSE YELLOWFIN TUNA POKE

Sumptuous sweet, sour, sesame, marinated raw yellowfin tuna served on top of a avocado guacamole with fresh mango, served with a drizzle of sweet chilli sauce and microgreens.  

My all time favourite tuna poke, I have tried my best to replicate the Disney Springs Boathouse tuna poke, I get to go there on vacation with my family and it is virtually the first place we go too off the plane and bear in mind from our front door in the UK to our USA Florida front door is 4391 miles and 15 hours travelling that says it all!  My husband is all about the oysters, as am I but the greedy girl in me also wants the tuna poke as that has my heart or is that my stomach!  We always share our food choices but NO! not in the boathouse restaurant this is the one place on Earth so far, (and we’ve travelled and eaten in some great places and countries) that we have to order our own full choices regardless if we’re both ordering the same!  We return several times and enjoy much more of the menu too.

Marinade time 30 mins / Prep time 10 minutes 


Ingredients 
(serves 2)

MARINADE 
2 tbsp light soy sauce
1 lime juiced
1/4 sesame oil
1 tsp rice wine vinegar
227g / 8oz yellow fin tuna diced

2 avocados mashed
1 tbsp finely chopped coriander 
1 ripe mango finely chopped
Sweet chilli sauce
Microgreens including coriander

There is one ingredient I don’t recognise and that is the red and white striped possibly reddish under the microgreens, I think from memory it may be a Japanese radish?  

First marinate the tuna in the soy, lime, sesame oil and rice wine vinegar, I like to start with the soy, add half the lemon juice, 1/4 tsp sesame oil and a dash of rice wine vinegar, this I then adjust to taste, I like to balance this marinade so it is not sour.

Leave the tuna to marinate for at around 30 minutes to much longer and the lime juice will cook the tuna (like ceviche).

Mash the avocados, stir through the mango and coriander reserving a tiny pinch for the sweet chilli sauce, seasoning is optional but because of the soy marinade I actually hold back!  Don’t faint!

To assemble I do use a large 5” professional plate moulding ring, fill half with the avocado and mango mix, top with the marinated tuna, remove the ring, top with microgreens and then pour a generous drizzle of the sweet chilli sauce around of the base of the plate, sprinkle a little hint of coriander and your done, enjoy.


CHEESE STUFFED CHUCK STEAK BURGERS

Juicy Lucy Lucifers

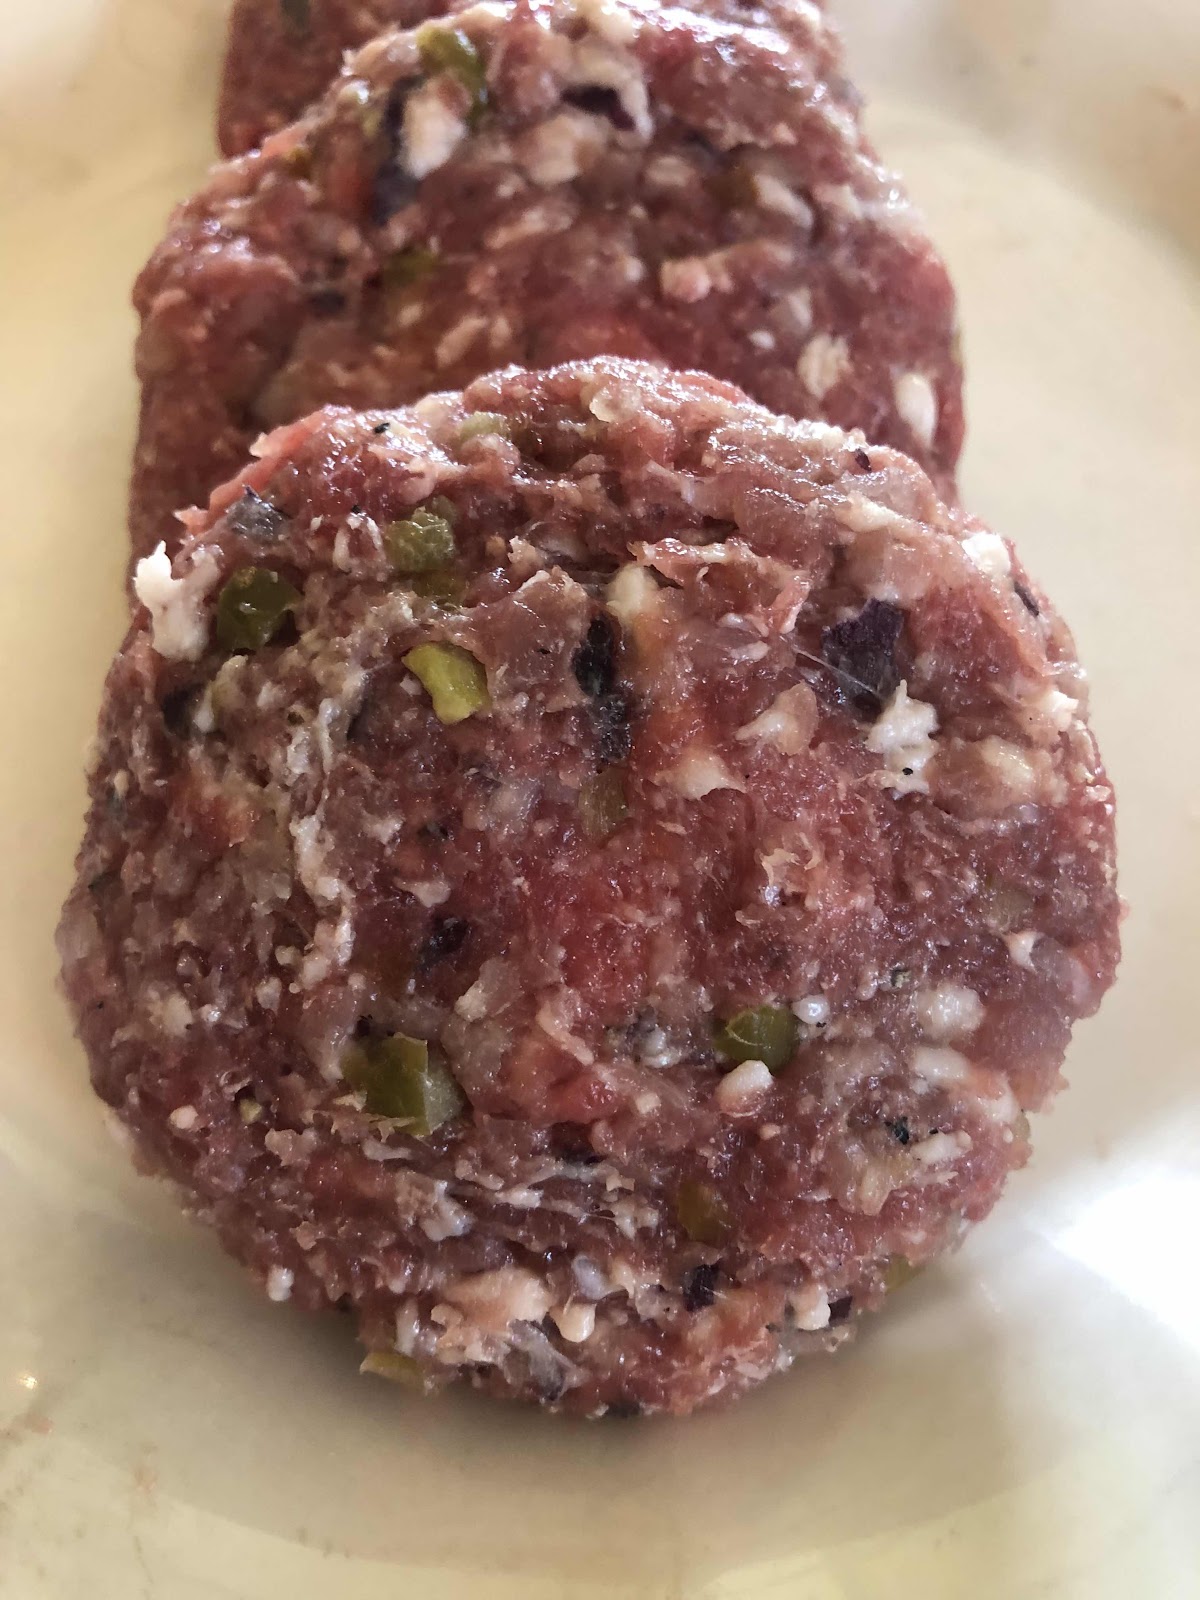
My favourite kinda burger, juicy chuck steak, I like to mince a 80/20 ratio of meat to fat, I also use three cuts of beef, two thirds chuck steak, one third fore ribs and short ribs, these are minced twice along with some red onion, streaky bacon and jalapeños for the patties, then a generous ball of creamy cheddar cheese stuffed in the centre, chargrilled over coals for that added smoke flavour, if you want a Lucifer then add hot sauce to the cheese centre for a lip smacking burst of buffalo hot sauce and choose to swap out the cheddar cheese for blue cheese.

These burgers can be made the day before and stored in the fridge until ready to cook.

WARNING:  THE CHEESE IN THE CENTRE CAN BE EXTREMELY HOT !

Serve these juicy Lucy’s in a toasted buttered brioche bun with your choice of fixings, I like crispy iceberg lettuce, red onions slices, sliced tomatoes, buffalo hot sauce mayonnaise and sometimes crispy fried onion strings.

Prep time 20 minutes / Grilling time 10 minutes


Ingredients 
(makes 4-6 burgers)

700g diced or ground chuck steak
300g diced or ground fore rib and short ribs
6 rashers of sweetcure streaky bacon chopped
1 red onion rough diced
2 fresh jalapeños rough diced
Himalayan sea salt
Fresh ground black pepper
6 slices of burger cheese or blue cheese
1 bottle of buffalo hot sauce optional
1 bottle mayonnaise 
6 brioche buns
1 stick butter

Light your BBQ coals 30 minutes before your ready to cook.  If your mincing your steak yourself mince twice, on the second mincing run the red onions, jalapeños and bacon through with the chuck.  Season with salt and pepper and mix throughly. Divide the meat into 4 for 225g/8oz burgers or 6 for 167g/6oz burgers.  Form in to balls and press your thumb down in the centre to make a well.


Fold or squish the cheese slices so they are the compact enough to fit in the centre of the pattie, bring up the sides of the pattie and mould over the top of the cheese, press slightly flat so the pattie is a even thickness.


BBQ to your likin, I like medium so I grill for 2-3 minutes on each side, a great tip is to move the patties to the warm area of the grill to rest and ensure that cheese centre is fully melted.  Warning: The Cheese Centre Can Be Burning Hot !

Ice berg wrapped juicy Lucy for those times when I’m being low carb but still want to enjoy a great burger.


7 Apr 2021

PORK AND PRAWN SESAME POT STICKER BALLS

Gluten Free

Recently having to remove all flours from my diet due to anaphylactic shock from eating a bread has pushed my inventiveness of some of my favourite foods, admittedly this is after I finished chewing on a lemon about being restricted with choices of food for life !  But when life gives you lemons, make LEMONADE...

These gorgeous balls are full of the aromatic flavours of ginger, lemongrass and sesame mixed with minced cold water prawns and belly pork make these a divine kind of pot sticker that when dipped in a sweet and vinegary soy sauce with a kick of wasabi are just as good if not better than that memory of a traditional pot sticker.

Prep 10 minutes / Cooking time 10 minutes


Ingredients
(makes approx 20)

20 raw cold water prawns
400g organic pork mince
1 tbsp fresh grated ginger
1/2 tsp minced lemongrass 
2 clove garlic chopped
3 spring onions finely chopped
2 tbsp shaoxing wine
1 tbsp light soy sauce
1 tsp fish sauce
1/2 tsp sesame oil
sea salt
white pepper

Dipping Sauce
100ml light soy sauce
50ml rice wine vinegar
10ml mirin
2 red chillies finely diced
1 spring onion finely diced
3 drops of sesame oil
1 pea size of wasabi

De-vein the prawns and chop by hand, place in a large mixing bowl, add the rest of the ingredients and mix together well.

With damp hands form into firm balls about the size of golf balls and place on a baking tray, bake at 180 C / 356 F for around 7 minutes or until cooked through, alternatively you can pan fry these instead.

Meanwhile make the dipping sauce, mix all the ingredients together, serve as soon as they are cooked and enjoy, enjoy, enjoy...


5 Apr 2021

FRENCH COGNAC CHICKEN LIVER PARFAIT

Really quick and simple yet very show stopper for that wow flavour impressing family and friends.  This can be as boozey or not as you like, for my family and friends they love the brandy buttery hit in this simple French classic pate.  This can be made days in advance and kept in the fridge and as a bonus freezes well, I make a double batch and freeze half.

Prep time 10 minutes / Cooking time 15 minutes


Ingredients 
(makes 6)

300g organic chicken livers trimmed
100ml Tio Pepe and 200ml water mixed
1 shallot finely diced
1 clove of garlic finely diced
25g of butter 
1 dash of ooil
1 sprig of thyme leaves only
80ml ish of brandy
100ml double cream
120g melted butter for the seal
Salt and pepper to taste


Place the chicken livers in the combined TioPepe and water and leave to soak for 30 minutes.  This releases any ammonia.  Drain and pat dry.
  
Meanwhile gently melt the butter with the olive oil and soften the shallots and garlic without colouring, add the chicken livers to the shallots and gently pan fry until pink, turn up the heat briefly, add the brandy, reduce by half, add the thyme leaves and taste for seasoning, I add a good pinch of sea salt and black pepper.

  Leave to rest until cool, then blend all the ingredients together until smooth or to the consistency you like, add the cream, give a quick blend, taste and adjust seasoning if needed.

If you want a really smooth pate, after blending smooth, pass through a sieve using the back of a
spoon.  Place your pate in a pretty ramekin or ball mason jars, gently melt the remaining butter and pour over the pate to seal and stop oxidation of the pate.   

This is a nice way to serve as the butter seal can be used on your fresh baked french baguette.


23 Mar 2021

THE BEST CHEESE SCONES IN THE WORLD...YES THE WORLD !

These are undoubtedly the most light, flakey melt in your mouth rich cheese, scones made with double cream and gorgeous cheeses, using a light but not too light hand and a puff pastry folding technique leave these scones super light, full of scone and cheese flavour, absolutely decadent on their own but even better loaded with fresh butter, brie and fresh of the bone ham, divine just divine!

Prep time 10 minutes / Cooking time 15-20 minutes


Ingredients 
(makes 12)

160g cold salted butter
400g supreme light flour
30g sugar
40g baking powder
200g double cream
220g full cream milk
350g aged cheddar (Montgomery) grated
1 egg beaten for wash

Pre heat your oven 220 C / 440 F
Place your baking sheet in the oven, if you have a stone baking sheet even better.

In a large bowl gently rub the butter in to the flour to a small rubble but not quite breadcrumb consistency, stir in the sugar and baking powder, mix in 80% of the cheese reserving the rest to sprinkle on top of the scones, then whisk the milk and cream together and stir gently to combine, at this point I turn the rubble mix out on to the work top and bring together by gently pushing the dough together but keeping my actions light, once you have a large flattish mound fold the dough in half, turn 90 degrees and press out to the same thickness as when you started, repeat this 3 more times pressing out a little less each time, this action is folding the layers of dough and fat which will give your scones the most unbelievable crumbly light melt in your mouth texture, not dissimilar to a really good home made puff pastry, cover with a tea towel and leave to rest for 30 minutes.

Press out the dough to approximately 2” thick and either cut squares and triangles with a knife or using a circle cutter cut out the scones in a straight down and up action, do not be tempted to twist the cutter as this suppresses the rise of the scone while baking.  Remove the hot baking sheet from the oven place your scones on, don’t over crowd, cook in two batches if necessary.  Brush the tops with egg wash, never the sides as this prevents the rise, place a sprinkling of cheese on the tops of the scones, turn the oven down to 200 C / 400 F and bake the scones in the oven for 15-20 minutes until light golden brown and a hollow sound when tapped on the bottom.

Remove from the oven and place on a cooling rack to cool for a few minutes, these are at their very very best served warm, if serving later wrap in a tea towel until needed and enjoy.


22 Mar 2021

EASTER HOT CROSS BUNS

Glorious spiced fragrant hot cross buns, lightly toasted and topped with lashings of Cornish creamy butter, a wonderful way to celebrate Easter.  I have never made hot cross buns before but was surprised how easy and un-complicated these were, I love working with dough and I knew these were going to be good as the dough was gorgeous and light to handle.  These only take 10 minutes to make and 3 x 1hr proves I followed/tweaked a little from Paul Hollywood's good food recipe

10 minutes hands on / 3 x 1 hour proves / Baking 20 minutes


INGREDIENTS
(makes 15)

500g 00 flour
10g yeast
1 tsp salt
100g caster sugar
300ml warm milk
80g butter melted
1 egg beaten
1 apple grated
Zest of one orange
1 tsp heaped ground cinnamon
100g dried fruit
25g mixed peel
100g plain flour
water
1 tbsp apricot jam


Place the flour, salt, sugar and yeast in a mixing bowl, warm the milk and butter together until the butter has melted.  Make a well in the centre of the flour and add the warm milk and the beaten egg, using a wooden spoon bring the mixture together to form a dough and knead for 5 minutes.  Place in a oiled bowl and cover the top with oiled clingfilm, not touching the dough, place in a warm place to prove for 1 hour.  Take the dried fruit and place in a bowl, add a fragrant teabag and pour over some hot water to soften the fruit.

Once 1 hour up mix in the cinnamon, apple, orange zest, mixed peel and dried fruit, (drain off the tea) and leave to prove again for another hour, the dough will be slightly wet and sticky that is good.

After this second prove, dust your worktop with flour and tip out your dough, divide the dough into 15 equal ish size balls and place on a greased baking tray with space around each bun to allow room for expansion, cover with oiled clingfilm loosely and again prove for another hour.

Now to apply your cross, mix the flour with some water to make a thick paste, fill a pipping bag and pipe on the cross.  Now they are ready to bake, 200 degrees for 18-20 minutes.  Once cooked glaze the top with some warm apricot jam, saw in half and pop under the grill to toast, load with way to much butter and I like to pop back under the grill for 30 seconds again to get the mound of butter melting from the top as the bottom will have soaked into the bun making these the best ever hot cross buns, eat immediately.

14 Mar 2021

RED TEXAS BEER CHILLI AND CHEESE TOSTADA BASKET WITH ALL THE FIXINGS

One of the best chilli’s I have ever made, I have always been a chilli girl but I recently learnt about Texas chilli, a chilli that originally walked a fine line just this side of indigestible, daring the mouth that eats it and defying the stomach to digest it!  Dubbed in 1977 The Lone Stars State Food and to a Texan anything else just isn’t chilli, now I was the spicy, chipotle smokey, ground chuck and hint of tomato chilli girl and this recipe changed that and the addition a cheddar beer sauce layer sealed the deal!  I still love my non Texas chilli beef and enjoy that in a more versatile way with tacos, burritos, nachos etc, whereas if I want a bowl of chilli it just has to be red Texas beer chilli.

Prep time 30-45 minutes / Slow cooking time 2 hours


Ingredients 
(serves 6-8 people)

Red Texas Beer Chilli
2 dried ancho chillies
2 dried de arbol chillies
2 dried guajillo chillies
2 tbsp olive oil or beef drippings
1 large white onion diced
1 large red pepper diced
2 fresh Fresno chillies
2 Anaheim peppers diced
3 tbsp masa harina 
1 kg ground chuck steak
1 kg chuck steak diced
4 cloves of garlic finely diced
1 tsp ground cumin
1 tsp dried oregano
1/4 tsp paprika (smoked optional)
1/2 tsp cayenne pepper
1 tsp Himalayan sea salt (to taste)
1 tsp fresh ground black pepper
2 bottles amber beer like blue moon
2 ltrs beef stock

Cheddar Beer Cheese Sauce
50g butter
50g plain flour
1 bottle amber beer
250ml single cream
250g mature cheddar cheese
150g cream cheese
5 shakes of Worcestershire sauce
1 tsp Dijon mustard
1/4 tsp paprika
1 pinch cayenne pepper
Salt and pepper to taste

Fixings
Flour tortillas
Corn tacos
Pickled jalapeños 
1 large pot sour cream
8 scallion spring onions finely chopped
4 large tomatoes deseed and finely chopped
4 tbsp fresh coriander chopped
1 red onion finely diced
1 bag salted crackers 1/2 the bag crushed

Heat the beef drippings or olive oil medium hot in a deep saucepan, brown the diced chuck steak, remove then add the garlic to the pan along with the chuck steak mince and brown off, remove from the pan, while the chuck is browning in a dry pan toast the ancho, de arbol and guajillo chillies then take off the heat and cover with 250ml of boiling water and leave to soften for 10 minutes, add to a blender and blitz to a smooth sauce, next add some olive oil or beef drippings to the pan, add the diced onion, pepper, fresno and Anaheim peppers to the saucepan and soften for 10 minutes then add the paprika, cayenne, oregano, cumin and masa harina to the softened onions and cook for a further five minutes, add the browned off chuck steak and mince to the pan along with the blitzed chillies, stock and beer, season with the salt and pepper.

Place in the oven in lidded casserole dish or cook on the stove over a medium low heat for 2-3 hours until the diced chuck steak is fall apart tender, season with salt and pepper to taste at this point.

Meanwhile while the chilli is cooking make the cheddar cheese beer sauce, on a medium heat, melt the butter for a couple of minutes so it slightly changes colour to a light brown, add the flour and stir until smooth, cook the roux for 5 minutes on a low heat, stirring regularly, add the beer and whisk to a smooth consistency, bring to a simmer and add the rest of the ingredients stir until combined and you have a velvet sauce, season with salt and pepper to taste.

To make crispy baked tortilla tostada baskets to serve the chilli in, place the tortilla in a deep oversized muffin or pie tin and place a piece of baking paper inside and fill with baking beads or dried beans to weight it down, bake for 10-15minutes, pile high for everyone to help them selves.

I like to make my chilli the day before as the flavours develop much deeper for the next day.  I like to serve this family style, big ole’ bowl’s of Texas red, cheddar sauce and all the fixings for everyone to load and layer up their bowl just how they like it, enjoy.


12 Mar 2021

CHICKEN POT PIE CHOWDER

A wonderful comforting hug in a mug, rich creamy roasted chicken pot pie with country vegetables, sweet corn and potatoes, this is a warming hearty dinner with love on a spoon.

Prep time 10 minutes / Cooking time 15 minutes


Ingredients 
(serves 4)

1 roasted chicken all meat removed and chopped or 4 raw breasts diced)
2 tbsp olive oil
2 tbsp butter
1 onion finely diced
1 carrot finely diced
1 clove garlic chopped
1 rib celery finely diced
2 large potatoes peeled and diced
1 corn on the cob corn off the cob!
1 bay leaf
1 tsp fresh thyme
150ml dry white wine (or milk)
2 tbsp flour
1.5 ltr chicken stock
300ml double cream
1 cup petit pois peas
1/2 tsp fresh grated turmeric (1/4 if dried)
1/2 tsp Himalayan sea salt 
1/2 tsp white pepper
1/4 tsp black pepper
1 tbsp chopped fresh parsley

Heat the olive oil and butter medium hot, add the onions, garlic, celery, carrots, potatoes, sweet corn, bay leaf and thyme, gently soften for around 10 minutes, if your using raw diced chicken add now, if your using cooked or left over chicken add once the sauce is made.  Next make the roux by adding the flour to the mix well, add the wine and stir in until smooth, bring to a simmer add half the chicken stock and cream and whisk until smooth, bring back to a gentle simmer and assess how thick your sauce is adding more chicken stock until your pot pie chowder is the consistency you like, nows the time to add the roast chicken if using then add the peas, turmeric and season with salt and pepper and serve with a sprinkle of fresh parsley.


27 Feb 2021

WOOD FRIED PIZZA OVEN BUILD YOUR OWN

ALL THE STAGES TO BUILDING YOUR OWN WOOD FIRED PIZZA OVEN 
1.  The base
2.  Laying the brick oven floor
3.  Making the sand dome former & first clay oven layer
4.  Cutting the oven door entrance
5.  Removing the sand former and lighting the first fire to dry out the oven layer
6.  Building the brick arch and clay chimney
7.  Building outer decorative brick arch (optional)
8.  Insulation clay slip layer
9.  Final clay oven layer 


This is a easy stage by stage guide to building your own wood fired clay oven that anyone can do including the obstacles I came up against and helpful hints that I found during the build.
  
The first stages of construction that will become a fabulous home made clay pizza oven, which will give you many years of wood fired cooking and of course the best wood fired pizzas EVER!

FIRST STAGE
Lots of google homework and finding a fantastic blog (clayoven.wordpress.com) was the biggest help, this guy has taken the river cottage clay oven building course and then blogged his own build, which I thank him for soooo much, as he is a fantastic writer and has documented very easy to follow step by step instructions with photos that have given me the confidence to attempt the same build, with a couple of Kristi tweaks!  

The fabulous bonus, apart from making this myself  is the low cost which I almost missed because I was going to buy a pre-fired made oven at approx £1500, but when I rattled off all my questions to the company confirming that their oven is ready to go once delivered as they stated it turned out it would be advisable to insulate the pre made oven, this entailed £500 more and a lot of chicken wire and plaster.  
This is when I decided I can make my own oven and is it really that awful if it is a bit rustic and homemade, my answer was NO, now all supplies are in at a cost of £380, which would be £150 lower if I could have found re-claimed fire bricks, but alas 3 reclamation yards, second hand shops and ad-papers and no luck meant I had to order new ones from Vitcas. 

SHOPPING LIST
I have made a 1m, circle cooking base with a 130cm (ish) finished clay outer from 3 layers
For the clay Oven
18 x 25kg of Tandoori ceramic oven clay (No need for puddling) Wahoo!
1msq base= 51 fire clay oven bricks
18 bags of sharp sand
1/2 bale of shavings
1 newspapers
15 re-claimed red London fired bricks for entrance arch
20 re-claimed red London fired bricks for outer decorative arch optional
kindling wood
For the Base
Breeze blocks
cement
brick girders
patio slate tiles
render
white paint
OR 
Wooden railway sleeps
hard core
sand
DO YOU NEED FOUNDATIONS?  
I put my base on my patio and did not have to dig any foundations.
1.  THE BASE/PLINTH AND FIRE BRICK OVEN FLOOR
I choose to have builders make my base with the breeze blocks for me so that it was ornate and had a functional log storage space, my base cost me £500, to save on costs choose the railway sleeper base and look at clayoven.word press.comas this blog will give you all the instructions for the base.


MY PERFECTIONIST SIDE IS SO GRATEFUL FOR MARKING THESE MEASUREMENTS BECAUSE I COULD RELAX FOR THE BUILD AS EVERYTHING IS IN PERMANENT MARKER AND I WILL NOT HAVE TO STRESS ABOUT MEASUREMENTS FOR THE REST OF THE BUILD I HAVE GUIDE LINES...!
Mark out on the top of your base a 1msq, this is for the fire brick oven floor.  Then you will need to mark the centre of each meter line, this is so you can find the centre of the meter square.  Then drawing a line from each centre marker side to side and top to bottom, will give you a marker in the middle of the square.  Take a pencil and tie a length of string around it, now place the pencil on one of the four centre markers, have someone hold down the string taunt and tightly on the centre marker of your base.  Draw a circle, this will be the line you follow with your sand former dome, and will be the inside cooking base of your wood fired pizza oven.
Now to mark out the finished clay brick oven size guide lines, for this I allowed seven centimetres for each clay layer, three in total, therefore the 21cm total depth, ish.  For this measurement I just measured 21cm from the edge of the centre of the meter square again and drew the outer circle so that I now know the min and max measurements.
 

2.  LAYING THE OVEN FIRE BRICK FLOOR
Old red London fired red clay bricks v re factory fire bricks.

There is little between them, however re factory bricks are the best heat conductors and heat quicker and stay hotter for longer, however if you can not find fire bricks it is still ok to use solid red clay old London bricks, these do the same job, but are slower to heat up and can sometimes flake a little.  but if this is all you can get this should not stop you from using them.  I have decided that I would like to keep my oven long term so I decided to use fire bricks, which meant ordering them direct which has cost over double more than using the red clay old London brick the reclamation yard had, but for me this is about the finished food and I want to start with the very best to end with the very best.

Lay a layer of sharp sand over your 1 m squared marked out base approx. 1 inch deep, I did use a spirit level to roughly check it was level, then I started to place the bricks in a herringbone pattern as this will help hold the bricks in place, I used a rubber mallet to gently tap the layered bricks to level them so that I had a smooth level surface.  I have extended the fire bricks out to the edge of where I assume my brick arch will be and this is as far as I have got today.  I cant wait for tomorrow to finish off some of the brick edges for cosmetic reasons and start the sand dome construction.  I am hoping that the big stage of sand dome, first clay bricks and arch construction will go smooth and then it will be home sailing after that... Look forward to telling you how it goes...

3.  MAKING THE SAND DOME FORMER
& FIRST OVEN CLAY LAYER


This was very easy to make, but if I had to make a really round dome I would have struggled a little, I think,  I found it easier to re-mark the centre points of the 1m2 outline and then to draw side to side to make a cross in the centre of the square, I then took my pencil on string, place my pencil on the centre point of one of the edges and pinned the string down on the centre point and drew myself a new circle which made the outline for the clay dome to follow.

I emptied 16 bags of builders sharp sand onto the centre of the oven base and started to form the dome, I found having the line to adhere to kept my dome in a almost perfect circle, my reason for this it that the outside of the dome will form the inside of my oven but also start the outside shape of the oven too.  Just keep adding sand to the top of the dome until you have a lovely shape.  I did find it very helpful to have my husbands eye from another point of view and standing on a chair really helped looking at the dome from above to help keep it equal all round.  

I decided to make my dome 60cm tall which is half the height of the 1m2 base.

Next job is to cover your sand dome with wet newspaper this was a little more of a challenge than I anticipated!  I eventually found it easier to enlist my husbands help and as I soaked each sheet of a newspaper in water my hubby laid each sheet on the sand dome, starting at the top and then using the stick ability of the wet paper on wet paper, laying each sheet from this top central sheet sticking it to the next sheet and working your way down and around covering all of the dome.


Now I am done until tomorrow when I will start the clay brick covering, I am on a schedule due to the lack of sunshine we are having this year!  Therefore I am now an avid weather watcher and know I have four days of sunshine to get the first four stages complete before the rain sets in again.

MAKING CLAY BRICKS & COVERING THE DOME


Because I have brought pre-puddled clay in 25kg sacks it was easy to cut the bricks from the block, I cut the block in 7cm panels and then each panel in half to try and keep a uniformed thickness. I got 6 bricks per 25kg sack plus a sliver left over, which you will find useful for filling gaps as you go. 

Top tip is to start this stage by mid morning, the reason for this is that this stage will take you approx. 4hrs if you are doing it alone, and then you will want to allow another 4hrs of drying time for the dome before you mark out and cut out your door, you really should cut your door the same day as laying the clay bricks, because the clay is firm but still soft and if you leave it to the next day you risk crumbling or cracking when you try to cut the door space.


As this is going to be the first layer and the actual inside of my clay oven I smoothed the inside of the brick with a little water and my hand to a reasonably smooth finish.  Take your first brick and press it against the base of the dome and compress it into place, I did push quite firmly, using your hand in a "kung foo chop" style movement hit the top of the brick towards the oven, this sort of creates a wedge shape on the top of the brick and helps push it firmly to the dome. 
The reason for the "kung foo chop" is two fold, firstly to ensure you press out any air from the clay and to make a neat tight fitting brick against the dome and secondly it will help when adding the next layer of bricks on top.  Add your second base brick and mould it onto the first brick, continue this all the way round and then you will have formed the first layer of bricks, repeat round and round and up and up all the way up until you have covered the dome completely. 


The first layer is complete!  Now I have to leave this to dry for 4hrs before I can cut the hole for the oven entrance.  For the size of the door, which is really important I trolled through forums and google's many information sites and the one formula that seemed to pop up over and over from seasoned oven builders and looked similar to the size on most of the pictures on google images confirmed that the height of your door should be 63% of the height of your oven.

4.  HOW TO CUT & CALCULATE THE MEASUREMENT OF YOUR OVEN DOOR

My oven is 60cm tall therefore 63% would measure my oven door at 38cm high.  Then the width, I went with the most popular measurements of half the width of your oven, now my oven is on a 1m2 but only four points touch the meter line, therefore some old school mathematics equations worked out that my oven was really 82cm therefore half would be 41cm.  

I also measured all my favourite roasting tins and all came in under 40cm and then the pizza peel I brought is 12" so everything should fit just fine.  I was worried about the height of my beer can butt chicken but this height is fine.

The extra information I have learned is the shorter the height of your door can mean the smoke will not want to leave the oven, and if you cut the door too tall your fire will burn quicker which will contribute to heat loss and your oven not come or stay up to temperature.

To cut my oven door I made a paper template of my measurements and marked it on the clay with a pencil and then cut the shape out.  I then smoothed the shape of the arch and will deal with the removal of the sand and fire of the oven tomorrow.


Well the next stage is to remove the sand and light a small pencil kindling fire to help dry out the clay, then to repair any cracks, eeek apparently don't panic there will be some!  Then to build the arch and chimney, after that I plan on taking a week off as my hands are very sore and a bit bruised from bashing all the bricks but I am sooooo pleased with my progress and can't wait to cook !!!


This brick will be on the inside of my oven dome, a nice family motto, and my son Oscar has also put his hand print in the base when the builders made if for us last year.

5.  REMOVING THE SAND AND FIRING THE OVEN

This I think so far is my most terrifying moment, I did not want to remove the sand in case the still wet clay dome collapsed but it had to be done...


Here it goes, I actually put this bit off for 24hrs as I was scared of the dome collapsing, I started digging the sand out by hand slowly and by the time I had removed one third I started to feel more confident and as the roof started to be exposed and not cave in I felt even more confident that the dome was going to hold its own.  18 sacks of builder sand later and the oven is ready for the first firing to help dry it out.  I have read that you may get some hissing and steaming and  few cracks but not to worry you can fill the cracks before the next stage...


So here it goes, lighting the very 1st fire in the 1st clay layer...


This stage is two fold, firstly and foremost is to help dry out the oven and not too fast either, but most importantly it is to confirm the size of your oven door.  This is to help you confirm or adjust the oven door because of how the smoke behaves.  Because the oven floor and dome is damp your first fire will smoke a lot which will give you a good guide line on where that smoke wants to go.  
If your oven door is too low then the smoke will pool up in the top of the oven dome which is not good, and if your oven door is to high then all the smoke will leave, this is a hard guess as you will want all your smoke to leave, my guess is I want to see the smoke pool for a second and then leave without any effort, this means the oven door is the right height.  
In the event of oven doors stress I believe a slightly larger door is better than a smaller one, this is because it may make the wood burn faster and cost a little more in wood but there will be efficiency and no smoke pooling.  But I am very happy that the calculations I followed are working perfectly.


Fingers crossed that this is confirmation of  a successful chimney and that my calculations based on the most common found on the Internet, forums and books is correct, (63% height of the dome and half the width) and so far I do believe it is so, all the smoke pooled and came straight out the oven door therefore I feel no adjustments needed


The oven drying out nicely you can see the colour change then you can see some cracks forming, I am really stressing over these cracks, the blog I am following says DON'T PANIC it is ok, just fill them once the dome is cold and then move on to the next stage, but I am really stressing !!!  There was some serious popping, cracking sounds and hissing but I am trying to chillax about this...


Finally the oven is up to 500 degrees temperature WAHOO this is so hot and the dome has held itself together, a few cracks that I think are frightening but they seem repairable.  So now on to the next stage of insulation coverage.

6.  BUILDING THE BRICK INNER ARCH AND CHIMNEY


I first made a sand dome former following the line of the oven door.  To fix the old reclaimed London clay bricks I used clay as opposed to mortar, the main reason for this is that mortar would probably crack and flake over time from the heat of the oven.  I am glad that I am keeping my oven rustic as this allowed the freedom to have a slightly wonky arch!


Very proud of my slightly wonky leaning pizza tower homemade arch!


The start of building the chimney, this again I did lots of comparing on the internet as I did not feel comfortable drilling out a whole in the oven top once it was hard, as the guide I am following does, in hindsight maybe I should have cut the chimney hole when I cut the door?  I found equal information for building the chimney above the door and for cutting a whole in the top of your oven.  The picture below is the design I followed as I already felt super confident that my oven door was the correct size because the smoke from the first fire came straight out of the door and did not pool, so it seemed reasonable to assume that my chimney would work efficient if above the front door.
  
This I will know for sure when I fire up the finished oven !!!


Whoooo my finished chimney, I assumed  it would take me approx 1hr to build the chimney, it took 3hrs, so my husband had to hold a torch for me to finish off the inside of the arch because I didn't start till late and it got dark!  I am really pleased the sides of the chimney are re-enforcing and supporting the arch as it was leaning back a bit from my wonky building.  The oven entrance is now protected as well from knocks and the inner brick arch adds a bucket full of character. 


Side view of the finished chimney, once the other two clay layers have been added to the oven you will only see the top 6" of the chimney. 

7.  BUILDING THE DECORATIVE OUTER BRICK ARCH


First I made another sand dome former to support the brick arch and then using mortar this time not clay I started to build the arch, I did not measure or work out the mortar gap as I am being rustic, but my arch is a bit wonky, I know why, I can see I laid the fifth brick with a hint too much mortar on the right side and it lowered my arch on that side but I am ok with it, and I am not doing it again


Ta Daa... The brick arch


I forgot that my first brick arch was leaning back a fair bit, and of course I had to follow the curve for this arch so after 6 bricks each side I realised that this arch was leaning back too, so I started to try and place the rest of the bricks slightly forward to bring this arch a little more upright, but it matters not as this is my rustic built pizza oven with love...


I felt a little worried removing the sand but the arch is holding it's own thank goodness.  I am really please with the double arch as it makes the oven feel bigger and a lot deeper now, even though it is not and I also love that I now have a warming area because of the outer arch which gives you a little more control when your are cooking.

8.  MAKING THE CLAY SLIP INSULATION LAYER


I used 4 x 25kg bags of clay and added approx 30% of that volume in water, you can always add more water if your clay slip is to thick.  You want the slip to be the consistency of yogurt.  One of the best tips I was given was to soak the clay in the water for a couple of days before your going to use it, this made mixing the clay super easy, the other tip was to beg, borrow or buy a mixer attachment for your drill and this was a well worth purchase and made light work of mixing the slip to a nice even consistency.


Transferring the clay slip to the wheelbarrow so that mixing in the shavings will be easier.


Next is to add the shavings to the clay slip to create the insulation layer, in all I used just over a third of a bale of shavings.  I just kept adding shavings into the clay slip in the wheelbarrow until I had a firm consistency that held together if I dropped it from waist height.  Excuse the gloves lol, I burnt my hands with the cement making the outer arch and I found it a challenge having to wear these gloves as I generally love to be a hands on girl.


As I did for the first clay layer, I formed bricks and laid them against the clay dome, pressing each one down firm to ensure no air gaps and moulding each brick into the next, this stage took me in total 3hrs to do, hopefully with enough sun this layer should be dry in four days and then I can move on to the very last stage...


 Insulation clay slip layer complete.

9.  FINAL CLAY LAYER


Laying the final clay bricks, this stage is exactly the same as the first stage, only 40% ish more clay will be needed as your dome is much bigger than when you started.  Once you have finished laying all the bricks sit back enjoy a well deserved cold beer and marvel at your well built oven, and if you are like me, start to get excited about all the cooking you are going to get to do...


My finished clay oven, in all it has taken me approx 40hrs over 3 weeks and lucky for me we had some great sunshine which helped my oven dry out.